|
|
Note: Clicking
on any picture or illustration will open a larger version of that art.
|
|
Who
Should You Call? |
This
information is for dealers only.
Before you pick up the phone to call for technical help or information,
stop for a moment to consider exactly what you need. That will determine
whether you call Techline or Technical Assistance
(fig. 1). Here are some guidelines.
TIP: Discuss this with your service manager, who
will provide guidance, procedures, phone numbers, forms and protocol,
as required.
The GM Policies and Procedures manual contains good information in sections
5.3.1 through 5.3.4 -- Dealer Guidelines for Assistance. Here you will
find phone numbers, hours of operation, forms and other information.
When to Call Techline
This is also called the Techline Customer Support Center or TCSC.
TCSC is concerned with the issues listed below. Before calling TCSC
be prepared with the items mentioned.
Vehicle Configuration Index (VCI)
- VIN
- Campaign or bulletin number
- P/N of module
- RPO code (2003 radio)
- New tire size (if applicable)
- Axle ratio (if applicable)
- Reason for change
Service Information (SI) or Labor Time Guide (LTG)
- Specific error
- Area of SI causing concern
- Bulletin or document ID number
- Current version
Techline Information System (TIS)
- Specific error in TIS
- VIN
- Screen where error is ocurring
Service Programming Systems (SPS)
- VIN
- Tech 2 software version
- Module being programmed
- Specific SPS error
- Battery voltage
- New or existing module?
- Pathing/documentation for issue
Tech 1/Tech 2
- Software version
- Error on screen
- Constant or intermittent?
- Serial number of Tech 2
- Test adapter 3000109
When to Call Technical Assistance
This is also called the GM Technical Assistance Center or GM TAC.
TAC is concerned with assisting dealers with the resolution of product
concerns that are difficult to diagnose or repair.
Before contacting TAC (US dealers), refer to bulletin 01-00-89-011B
for guidance. It explains how to make a successful TAC call.
The Service Technical College offers an excellent resource on the GM
Training website at www.gmtraining.com.
Follow this path:
- Menu
- Service Know-How
- Launch TECHAssists
- Technical Service Bulletin Enhancements
- Then scroll to 010089011BT1 -Technical Assistance Preparedness Information
Form.
You are required to fill out a TAC form before placing your phone
call. The bulletin includes a copy of the form. Or additional
copies can be
printed from the DWD store on the DealerWorld website.
Follow Strategy Based Diagnostics and include your findings on the
form.
Provide the SI document number or equivalent of the technical issue
you’re working on.
Provide the dealer code, VIN and RO number.
-
Thanks to Jack McVoy and Matt Singer |
|
figure
1
|
| return
to Table of Contents |
|
|
| TechLink
Subscription |
Ordering Additional Copies
Beginning with the October 2004 issue, the quantity of TechLink
newsletters being sent to dealers is 3, 5 or 10 copies, depending on
dealership size (US only). Since that time, we’ve received numerous
inquiries about how dealers can obtain additional copies.
ANNOUNCEMENT: Effective immediately, US dealers can now order/purchase
additional copies of TechLink through the DWD Store (fig.
2). Fill in the total amount desired
(fig. 3). You will be billed only for the additional copies.
TIP: Refer to
the screen print of the site. The Subscription selection can be accessed
only by sites with a BAC code.
Dealers can also use this site to adjust the number of bulletins and
other items now being received in their weekly DWD box.
- Thanks to Mark Stesney |
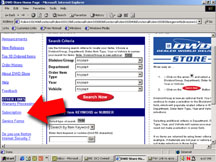
figure 2
|
 figure
3
figure
3
|
|
|
|
|
Automatic Level Control Compressor |
This
information applies to all Cadillac Escalades and any of the Chevrolet
and GMC Utilities with the G69 Automatic Level Control option.
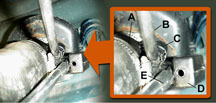
A revised compressor (fig. 4) has been
released with two improvements to protect against water intrusion.
A Motor
B Compressor
C Hose
D Air box
The first is a coating applied to the internal solenoid wires to better
protect them from water entry into the compressor.
The second is a new design for the plastic air intake box (fig.
5) that is mounted near the fuel filler (fig.
6). The new design prevents water entry into the compressor and
eventual internal corrosion.
A Fuel filler neck assembly
B Differential breather hose
C Retainer
D Air box
E Air intake hose
The new compressor is supplied with a hose that has the new air box
attached. When you install the replacement compressor, it’s important
to install the complete compressor assembly, including the hose and
air box.
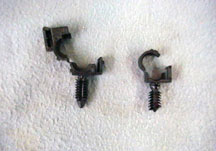
The airbox/hose and the differential breather hose are attached at the
same location to the fuel tank filler neck. The attachment of these
components requires a common plastic barbed “Christmas tree”
retainer (fig. 7).
Be sure to include the old air box and air hose with the compressor
when you package them for warranty return.
-
Thanks to Wende Isaacs, Delphi |

figure
4
|
 figure
5
figure
5
|
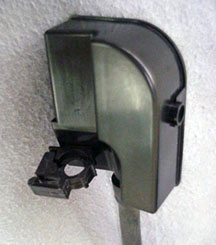
figure 6
|
figure
7
|
return
to Table of Contents
|
|
| Obtaining
Service Forms |
Occasionally,
when you’re performing the procedure in a service bulletin, you’re
required to obtain and fill out a form. Now, there’s a convenient
way for US dealers to obtain these forms on the web.
TIP: This procedure
requires administrative privilege. See your service manager.
Go to the GM DealerWorld website and follow this path:
- Business Administration
- DWD Store
- Other (in left column)
- Service Forms
The Service Forms page provides quick access to forms referenced by
and included in bulletins (fig. 8). When
additional bulletins or documents are referenced from the main bulletin,
they are included below the main bulletin. Where available, printable
versions of the forms are included.
Some of the typical forms available include:
- Technical Assistance Information Form
- Field Product Report
- Part Request Form
- PCM Diagnostic Analysis
- Product Feedback Form
- Vibration Analysis Worksheet
-
Thanks to Mike Sowa |

figure
8
|
| return
to Table of Contents |
|
| Using
a Battery Charger During Programming |
The programming of modules
requires the ignition key to be turned on, without the engine running.
This, of course, means that during the programming event, the vehicle’s
systems are operating from the vehicle battery. This, in turn,
means that the vehicle’s battery must be adequately charged. Ideally,
fully charged.
TIP: Be sure
all accessories are turned off.
It’s recommended not to connect any external power supply to the
vehicle battery as a part of the programming procedure. Here are some
reasons why a battery charger should not be connected during programming.
First, the voltage output of the charger may be higher than normal system
voltage, either constantly or in spikes.
The programming tool (Tech 2 or Techline terminal) commands all modules
of the vehicle to “be quiet” except the one being programmed.
This is to avoid the confusion of messages on the data line that would
result if multiple modules were awake and conversing. However, if the
module being programmed sees a voltage above a certain threshold, it
may also shut itself down in an act of self-preservation. This will
interrupt programming.
Another possiblility is that some of the other modules may be awakened
temporarily as charger voltage varies. This could then result in confusing,
unwanted conversations on the data line, interrupting programming.
Second, the battery charger output may contain unwanted AC. Although
a charger is designed to convert AC (alternating current) to DC (direct
current), it’s possible that some of the AC is not rectified,
and passes out of the charger as “noise.” This may also
be called AC ripple, or artifacts. Regardless, the presence of anything
but pure DC can cause interference with the programming process.
TIP: It’s
recommended that you unplug any devices from the vehicle’s power
outlets (cigarette lighters) for two reasons. First, the devices are
consuming power, which reduces system voltage. And second, some plugged-in
devices can cause interference on their own. One such example would
be a generic cell phone charger.
-
Thanks to Devin Koski and Gary Clark |
| |
| return
to Table of Contents |
|
| Exterior
Plastic Components |
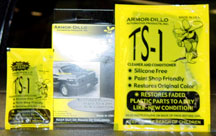
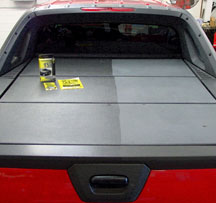
Bulletin
04-08-111-001B explains how to deal with discolored or chalky body cladding
and cargo covers on the Avalanche and Cadillac Escalade EXT, using a
product called Armor-Dillo TS-1 (fig. 9 and 10).
This is a one-time warranty repair and future coatings are the customer’s
responsibility. A retail maintenance pack is available for resale by
your parts department. See the bulletin for ordering information.
Armor-Dillo is silicone-free and is formulated to remove oxidation,
discoloration, staining and fading from hard molded plastic automotive
parts. It’s especially effective on grained surface textures.
When used on parts that have white wax buildup, it essentially dissolves
the wax.
Armor-Dillo is suitable for treating unpainted plastic body components
such as mirrors, side moldings, and cowls, and coated metal such as
roof racks. Also grained bumper covers, cladding and fascias, as used
on Vibe, VUE, Envoy, TrailBlazer, Colorado, Hummer and Tahoe.
Armor-Dillo is not intended for use on painted surfaces, although if
it is accidentally applied and allowed to dry, you can remove it with
an application of mineral spirits.
It’s also not intended for soft rubber parts, including tires.
Refer to the bulletin for detailed application instructions. Here are
a few important highlights.
- The surface must be clean, dry and silicone-free before application.
Wipe down the surface with mineral spirits ro rubbing alcohol to remove
wax or silicone.
- After application, allow the product to sit a few minutes. Then wipe
the surface with a damp, lint-free towel, or it will remain tacky.
- A second application may be needed.
-
Thanks to Robert Saunderson and Dave Snellings
|
figure
9
|
figure
10
|
return
to Table of Contents |
|
| Avoiding
CD Player Difficulties |
In a recent review of over 1,000 returned radios, about 25% had a CD
stuck in them because it was broken, cracked, warped, had a label that
was wrinkled, or had some other condition that makes a CD unplayable
in a slot-load type CD player.
TIP: There have been some software improvements
made recently on some vehicle lines, with more coming, that will solve
many intermittent customer problems. Before replacing a radio, always
look for service bulletins describing how to update software to fix
problems.
Here are some things to remind your customers of, if they’re experiencing
difficulties with their CD players.
Dirt or damage -- The CD player “looks at”
the bottom, shiny surface of the disc (opposite the printed side). If
this side is damaged, cracked, broken, scratched or dirty, even from
fingerprints, the CD may not play properly or at all. The disc can be
cleaned with a soft, lint free cloth, wiping from the center outward.
Do not use cleaner.
Keep discs out of direct sunlight or high heat. Keeping them on the
sun visor or where they are in direct sunlight can cause them to warp
and jam inside the CD player.
TIP: Interrupting battery power (pulling the fuse)
will sometimes release a stuck CD. If a disc is stuck, and you get it
out, check it for warps, cracks, etc. If it is damaged, do NOT replace
the radio. Instead, remind the customer how to avoid damaged discs.
“Homemade” discs -- Paper labels can eventually
warp and wrinkle, and this will cause the disc to jam inside the CD
player. Try labeling the top of the discs with a soft magic marker instead.
If there is difficulty playing a CD that was recorded using a computer
CD-R/RW burner, record the disc again on a different burner. Insert
the newly recorded disc into the radio mechanism and compare. If the
newly recorded disc plays better, the CD-R/RW burner used to record
the first disc is nearing the end of its life expectancy.
While the CD player will play homemade copies of store-bought standard
audio track discs, it will play MP3 files only if ‘MP3’
appears on the front of the radio.
MP3 -- There are numerous ways to burn an MP3 disc.
Here are some tips to make them most likely to work in the vehicle.
Always ‘finalize’ the disc if it is burned in multiple sessions.
In fact, it is best to burn the disc all at once. Do not mix standard
audio and MP3 files on one disc. When creating MP3 discs, do not use
more than 50 folders, or 50 playlists. Avoid having a total of more
than 255 folders, playlists, and files. When playing MP3 discs, rotate
the tuner knob to navigate among files. Finally, make sure playlists
have a .pls, .m3u, or .rmp extension – other extensions will not
work.
If all of these tips are followed and there is still trouble playing
homemade CDs, a newer CD burner or different software may be needed
to make the discs.
-
Thanks to Jim Colyer |
| |
| |
| |
|
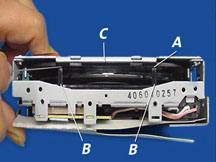
| CD
Player Concern |
This
condition can affect the single CD player in the following vehicles:
- Chevrolet Impala, Monte Carlo, Cavalier and Venture
- Pontiac Grand Am, Sunfire, Bonneville, Aztek, and Transport
- Oldsmobile Alero and Silhouette
A customer may comment that the CD player will not accept a CD, will
not play, or will not eject a CD.
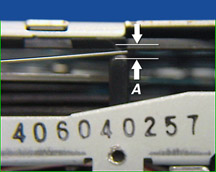
The condition may result when the gap (A) between the insertion protection
gates (B) and the top guide plate (C) is larger than specification (fig.
11 and 12). This was caused by a warped top guide, which has
been corrected in production.
Exchange the audio unit, so the top guide plate can be inspected. Do
not attempt to remove a stuck CD.
-
Thanks to Jeff Strausser |
|
figure
11
|
figure
12
|
| return
to Table of Contents |
|
| Corvette
Bose Speakers |
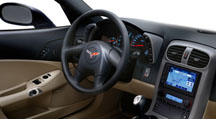
According
to a recent investigation, a door rattle concern in the 2005 Corvette
may be caused by the Bose speaker rattling in the door panel (fig.
13).
To avoid unnecessarily replacing a speaker, perform the steps in bulletin
05-08-44-004 to determine if the listed repairs will correct the condition.
- Thanks to Art Spong and Ken Fischer |
figure
13
|
| return
to Table of Contents |
|
| Radio
Reprogramming |
This information applies to 2005 Buick Rainier, 2005 Cadillac Escalade,
Escalade ESV, Escalade EXT, 2005 Chevrolet Avalanche, Express, Silverado,
Suburban, Tahoe, TrailBlazer, TrailBlazer EXT, 2005 GMC Envoy, Envoy
XL, Envoy XUV, Savana, Sierra, Yukon, Yukon XL, Denali, 2005 HUMMER
H2 with CD Player Radio (RPOs UB0 or UB1).
Some customers may comment about one of the following conditions:
- Long CD load-to-play time
- CD ejects with an error message of CHECK CD
- CD does not return to previous track after an ignition cycle
- The clock resets to 12:00.
- CD stuck in player, CD won’t play, or won’t eject without
any indication of clicking noises and/or mechanical operation.
DO NOT replace the radio for these conditions.
A software anomaly within the radio has been found. Reprogram the radio
with an updated software calibration. This new service calibration was
released with TIS satellite data update version 2.0 available February
7, 2005.
TIP: A unique
labor operation number R0125 covers this Radio -- Reprogram (0.4 hr.).
This number will not be published in the Labor Time Guide.
TIP: Be sure
your Tech 2 is updated with the latest software version.
TIP: Advise the
customer that home-burned CDs must be burned with a "closed session"
or the formatting will be incomplete and the player will not read the
CD. CDs should not have adhesive paper labels affixed to them, because
the labels may lift off in the player.
- Thanks to Doug Daugherty |
| |
|
return
to Table of Contents |
|
| Headphone
Ear Pad Replacement |
This information applies to 2001-05 GM Passenger
Cars and Light Duty Trucks (including Saturn and HUMMER H2) with Rear
Seat Entertainment System (RPOs U32, U42).
The foam pads can be replaced separately from the headphone set. It
is not necessary to replace the complete headphone set. Your customer
can purchase headphone replacement foam ear pads in pairs directly through
the supplier. Have them call Unwired at 1.888.293.3332, then prompt
(0).
The replacement, p/n CS-980 (thick earfoam) (fig.
14), can be ordered for $3.50 (USD) per pair plus $1.50 USPS
shipping.
TIP: Pricing
information is in U.S. dollars and is subject to change without notice.
-
Thanks to Doug Daugherty |
 figure
14
figure
14
|
|
return
to Table of Contents |
|
| New
OnStar and XM Antenna |
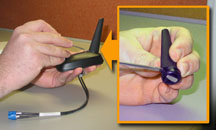
A
new OnStar or OnStar/XM antenna is a mid-year change for the 2005 Colorado
and Canyon. It will be used on many other vehicles in 2006.
A hidden locking tab must be depressed to remove the mast from the antenna
base (fig. 15). Insert a small screwdriver
between the mast and the base to depress the locking tab while turning
the mast to unthread it from the base.
-
Thanks to Jim Hughes |
figure
15
|
|
return
to Table of Contents |
|
| MP3
Software Update |
An article in the January 2005 TechLink described
operating conditions that can be corrected by installing software from
the 2005 US8 MP3 Radio Software Upgrade CD. This was based on information
available at the time, and erroneously stated that it did not apply
to the Chevrolet Equinox.
The fact is that the upgrade on the CD applies to all of the following
vehicles, including Equinox, which is mentioned on the label. Here is
the corrected article.
This information applies to 2005 Buick Rainier, Chevrolet Colorado,
SSR, TrailBlazer, TrailBlazer EXT, and Equinox; and GMC Canyon, Envoy,
and Envoy XL vehicles with MP3 (RPO US8) Radio CD Player. A software
anomaly within the radio has been found.
Some owners may comment that when playing a CD, the radio displays the
last track number for about 5 seconds, but there is no audio. The display
changes to "READING" for about 15 seconds. Then it may play
the CD or eject the CD with a "CHECK CD" message.
TIP: Each dealership
will receive the "2005 US8 MP3 Radio Software Upgrade" CD
through the Dealer World Delivery (DWD Box) process the week of November
29th, 2004.
Install the software upgrade CD into MP3 radio. Allow the software files
to transfer completely. This should take 1-2 minutes. This installation
should correct the condition noted above. |
|
| |
| return
to Table of Contents |
|
| Bedliner
Installation Tips |
These
tips will help you install the under-rail bedliner in pickup trucks
and protect the paint.
Before installation:
- Read instruction sheet first
- Mask or cover the box side rails at the top and inside surfaces to
prevent scratches or damage during installation (fig.
16).
- Be sure truck bed and bedliner are clean
- Perform the necessary trimming before installation, using pre-scribed
lines:
- Front rail lip, if desired. This is a two-step process -- follow instruction
sheet.
- Tie-down cutouts
- Outlet cutouts, in hybrid trucks
During installation:
- Use two people for installation
- Follow instruction sheet for placing bedliner in box and inserting
side walls of liner under side rails
- Use caution when tightening self-threading screws in pre-drilled holes,
to avoid stripping threads
-
Thanks to Dave Roland |

figure
16
|
| return
to Table of Contents |
|
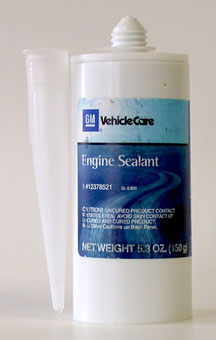
| Engine
Sealants |
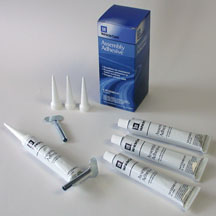
General
Motors is consolidating the use of liquid gaskets/engine sealants that
will replace all previous engine sealants for current and past models.
The part numbers in the table supersede all engine sealing products
referred to in SI and are to be used according to the guidelines shown.
-
Thanks to Brian LeClair
| 12346141
US Vehicle Care (fig. 17) |
To
be used on all intake manifold end seals (“China Wall”
seal) and all other applications that have a gap to be sealed of
1.0 mm or larger. This product is compatible with all synthetic,
synthetic blend, and mineral oils. Suggested bead size is 3.0 +/-
.75 mm without a groove and 4.5 +/- .75 mm with a groove. This product
has a maximum working time of 20 minutes. Full cure time is 24 hours.
Assembly may be filled with oil immediately after joint is closed
and torqued. |
| 88900327
ACDelco US |
| 89022195 ACDelco
Canada |
| 12378521
US Vehicle Care (fig. 18) |
To
be used on any application that has a gap to be sealed of less than
1.0 mm. This products is compatible with all synthetic, synthetic
blend and mineral oils, as well as all coolants including DexCool.
This product has a maximum working time of 20 minutes. Full cure
time is 24 hours. Assembly may be filled with oil or coolant immediately
after joint is closed and torqued. |
| 88901148 ACDelco
Canada |
|
 figure
17
figure
17
|
 figure
18
figure
18
|
| return
to Table of Contents |
|
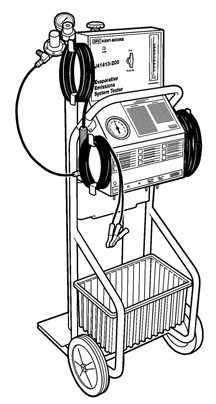
| EVAP
Pressure Sensor |
On
the 2005 Vibe, it is possible to mis-diagnose the EVAP system due to
incorrect FTP (fuel tank pressure) sensor readings on the Tech 2.
With Tech 2 software version 24.009, 24.010 or 25.001 installed, inaccurate
fuel tank pressure sensor readings may be noted during EVAP system diagnosis.
If inaccurate fuel tank pressure sensor readings are noted but an EVAP
DTC is not resetting, disregard the inaccurate readings. Do not replace
the PCM or fuel tank pressure sensor in an attempt to obtain accurate
readings. Use the J-41413-200 Evaporative Emissions System Tester (fig.
19) and SI to confirm proper EVAP system operation.
Additionally, 2005 FWD models have an EVAP service bay test available
on the Tech 2 that can be used to confirm proper EVAP system operation.
These inaccurate readings are a result of a Tech 2 software concern,
not a fuel tank pressure sensor or PCM concern.
The fuel tank pressure (FTP) sensor data parameter on the Tech 2 scan
tool is adding voltage readings, and removing pressure readings on CD
number 3, released in March.
DTCs P0441, P0450, P0451, P0452, P0453, P0455, and P0456 are revised
in both the 1.8L (LV6) and the 1.8L (LNK).
Scan tool Data List and Scan Tool Data Definitions are revised in both
the 1.8L (LV6) and the 1.8L (LNK).
The following documents in SI are affected:
LV6 |
1479333,
1479334, 1509940, 1546760, 1546762, 1546764, 1546765, 1501244,
1501235 |
LNK |
1479409,
1479412, 1501260, 1501259, 1501258, 1501256, 1501257, 1501248,
1501249 |
-
Thanks to Jeff Strausser |
 figure
19
figure
19
|
|
return
to Table of Contents |
|
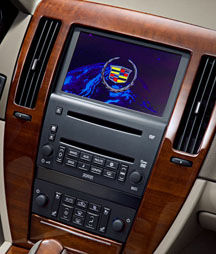
| Bluetooth-Enabled
Phone Interface |
This
information applies to the 2005 Cadillac STS with Bluetooth-enabled
phone interface.
1. Available at no extra charge with purchase of (YQ4) Bose 5.1 Studio
Surround Sound System with Navigation (fig. 20).
2. Consult STS Navigation System manual, not the STS owner's manual
for set-up operation of Bluetooth phone feature.
3. Customer must have a Bluetooth-compatible phone. Phones being recommended
are:
- Motorola V600 (preferred option)
- Nokia 6310i
- Sony-Erikson T68i or T616
4. System can discover up to 7 phones when searching for available devices.
5. System can store up to 12 paired phones in the device list.
6. User can dial a phone number by:
- Using the phone handset
- Using the Bluetooth screen dialpad in the STS
- Using the voice recognition system to dial a specific number (continually
or in parts) or saying a voicetag (such as 'Bob Norris')
- Choosing from last 10 dialed or received list
- From the address book.
7. Before pairing up the Bluetooth phone with the STS, be sure that
the phone is in the 'Bluetooth Discoverable' mode. Consult the phone
owner's manual for instructions on how to do this.
8. Up to 50 phone numbers per driver (3 drivers) can be stored in the
STS vehicle address book memory. Also last 10 received and last 10 dialed
per driver are stored.
9. The radio automatically connects to the default device as the customer/user
starts the vehicle.
10. System supports 3 way calling. User can receive another call while
in an active call and then switch between the two calls.
11. The address book in the STS is not associated with the address book
on the Bluetooth phone.
12. A total of 20 name tags for Driver 1 and 20 names tags for Driver
2 can be stored in the system. Name tags can be stored for either phone
number dialing or navigation destination entry.
13. The system will automatically add 1 in front of the number when
dialing it.
14. Active calls are automatically transferred over to private mode
(head set) when the vehicle is turned off.
15. Can directly dial a POI phone number (if available) from the POI
information screen when BT phone is connected.
16. User has the ability to change pairing password and device name.
-
Thanks to Dave Wells |
|
figure
20
|
| return
to Table of Contents |
|
| Quadrasteer
Dog Track |
Owners
of some 2002-05 Chevrolet and GMC full size trucks and utilities with
Quadrasteer (NYS) Rear Wheel Steering may comment that the rear wheels
stay turned even after the front wheels are straight. This may be accompanied
by a Service 4 Wheel Steer message on the DIC and/or a DTC set in the
4 Wheel Steer module.
When a fault is detected during a turn, the Rear Wheel Steering module
will perform a controlled re-centering of the rear wheels. It may take
up to 30 seconds for the rear wheels to center. During this 30 seconds,
the owner may have straightened the front wheels and the rear wheels
could still be turned (dog tracking). An owner may believe that the
rear wheels are stuck in the turned position when in fact this is normal
operation.
Do not let this normal operation add confusion to the actual concern.
Perform normal diagnostics for the DTC set.
-
Thanks to Jim Will |
| |
| return
to Table of Contents |
|
| Outside
Temperature Reading |
Owners
of some 2001-05 Chevrolet Silverados and GMC Sierras with 6.6L Diesel
may comment that the outside ambient temperature reading is too high
or incorrect on the inside rearview mirror. With the winter front cover
installed over the radiator grill, the ambient air temperature sensor
is reading the engine compartment temperature instead of the actual
ambient air temperature due to its location.
Reposition the ambient air temperature sensor to an existing hole on
the radiator support under the left turn signal assembly. This eliminates
the bracket at the original location. The wiring harness will now be
12 inches (304.8 mm) longer than needed. Neatly bundle the excess wire
and install a suitable tie.
-
Thanks to Jim Will |
| |
| return
to Table of Contents |
|
| Radio
Theft LED Does Not Flash |
Owners
of some 2003 -05 Chevrolet, GMC, Cadillac, and Hummer H2 full size trucks
and utilities may comment that the red radio theft LED does not flash.
Starting with the 2003 model year, owners no longer have to enter a
security code into the radio to activate the theft feature like earlier
model years. The radio theft feature works automatically by learning
a portion of the VIN.
During assembly of the radio, a manufacturer’s counter is set
at 255 counts for assembly purposes and should be set to 0 counts at
the end of assembly. If the counter is not set to 0, the radio LED will
not flash. Each cycle of the ignition switch reduces the counter by
1 count. Once the counter reaches 0, the red LED starts to work normally.
If an owner requests the LED to operate immediately, the ignition key
must be cycled as many times as required to run the remaining counts
to 0. To count as a
cycle, the key must be left in the RUN and OFF positions for least 3
seconds each.
TIP: To prevent the Retained Accessory Power (RAP)
from keeping the radio alive when the ignition is off, be sure the driver’s
door is open during the key on/key off process.
TIP: SPS programming the radio will not correct
the concern.
-
Thanks to Jim Will |
| |
| return
to Table of Contents |
|
 Car Issues
— Fix It Right the First Time (new issues in bold) Car Issues
— Fix It Right the First Time (new issues in bold) |
Model
Year(s) |
Vehicle
Line(s) --
Condition |
Do
This |
Don’t
Do This |
Reference
Information / Bulletin |
2005 |
Equinox
LT/LS (AWD Only) – Moan, Bind or Growl from Rear during
Low Speed Turns |
Replace
RDM coupling (clutch pack) with proper sealers. |
Don’t
replace complete rear drive module. |
04-04-20-004 |
2005 |
Cobalt/Pursuit
(Built Before January 17, 2005) – Fuel Gauge May Not Go
Completely to Full |
Recalibrate
ECM with updated calibration, version 1.75. |
Don’t
replace fuel module, fuel level sensor assembly or fuel gauge. |
05-08-49-002A
|
2003-2004 |
Cavalier,
Sunfire – HVAC Control Head, Difficult to Adjust Mode Dial |
Replace
foam which can cause bind condition. |
Don’t
replace HVAC control head, module or cables, unless damaged. |
03-01-38-005B
|
2002-2005 |
Cars
and Trucks – Multiple Driveability Symptoms/Clogged Fuel
Injectors |
Clean
fuel injectors as described in Bulletin. |
Don’t
replace fuel injectors. |
03-06-04-030A |
2004-2005 |
Grand
Prix – Outside Rearview Mirrors |
Replace
mirror glass or motor, whichever is defective. |
Don’t
replace complete mirror assembly. |
04-08-64-009 |
2004 |
Grand
Prix – Steering, Suspension or Cradle Click Noise |
Install
new two-piece sleeve and spacer to steering gear mounts. |
Don’t
replace steering gear or cradle. |
03-02-32-048A |
2000-2003 |
Century,
Regal, Lumina, Impala, Monte Carlo, Grand Prix, Intrigue with
3.8L L36 Engine – Coolant Leak |
Replace
upper intake manifold gasket only. |
Don’t
replace upper intake manifold assembly for coolant leak condition. |
03-06-01-016 |
2001-2004 |
Aztek
(01-04), Rendezvous (FWD, 02-04), Venture/Montana/Silhouette (01-04)
– Pop and/or Rattle in Exhaust Down Pipe |
Follow
procedure in bulletin using clamp P/N on down pipe to correct
rattle/buzz noise. |
Don’t
replace converter assembly for rattle/buzz noise without completing
instructions in bulletin. |
03-06-05-003
|
2000-2004 |
Cavalier/Sunfire/Alero/Grand
Am – Inoperative Sunroof Module |
Retime
module or replace only motor for inoperative complaints. |
Don’t
replace entire sunroof module assembly. |
03-08-67-009A |
1999-2004 |
All
Cars and Trucks – Brake Warranty, Service and Procedures |
Issue
One: Refinish brake rotor.
Issue Two: Measure for LRO |
Issue One: Don’t replace brake rotors.
Issue Two: Don’t measure for LRO |
00-05-22-002D |
|
| return
to Table of Contents |
|
|
 Truck
Issues — Fix It Right the First Time
(new issues in bold) Truck
Issues — Fix It Right the First Time
(new issues in bold)
|
Model
Year(s) |
Vehicle
Line(s) --
Condition |
Do
This |
Don’t
Do This |
Reference
Information / Bulletin |
2002-2005 |
Tahoe, Suburban, Yukons, Escalades, Avalanche, H2 – Exhaust
Pop/Ping Noise |
Replace
heat shield. |
Don’t
replace exhaust system. |
03-06-05-008B |
2005 |
Escalades, Tahoe, Yukons, Suburban, Avalanche, TrailBlazers, Envoys
– Adjustable Pedals Don’t Recall Preset Positions
and/or Front Heated Seats Turn Off After 30_Seconds |
Replace
brake pedal position switch. |
Don’t
replace brake pedal assembly. |
05-08-143-001 |
2003-2005 |
Full Size Pickups and Utilities – Snap/Popping Noise from
Front of Vehicle |
Slot
left side mounting holes on front crossmember using procedure
found in Service Bulletin. |
Don’t
replace crossmember. |
03-08-61-002D |
2002-2004 |
Chevrolet
Silverado, GMC Sierra – Accumulator/Accumulator Bracket |
Replace
accumulator and/or accumulator bracket. |
Don’t
replace compressor. |
02-01-38-007C |
2004 |
Tahoe, Suburban, Silverado, Yukon, Yukon XL, Sierra, Escalade,
Escalade EXT, Escalade ESV, H2 – Passenger Door Module and
RKE Inoperative |
Re-flash
passenger door module. |
Don’t
replace passenger door module. |
04-08-52-005 |
2001-2003 |
Fullsize
Pickups – Injector Replacement for High Flow Rates |
Use
Corporate Bulletin Number 04-06-04-007A for injectors with high
fuel return rates. Use Special Policy 04039 for all 01-02 vehicles. |
Don’t
replace 8 injectors for complaint other than high fuel return
rates. All other injector failures are fix as failed. |
|
| 2004-2005 |
All
Cars and Trucks – State-of-Charge Upon Delivery of a New Vehicle |
Check
battery’s state-of-charge per revised PDI procedure using
J42000 or J42000-EU. |
Don’t
remove and replace battery. |
02-06-03-009A |
| 2002-2004 |
Fullsize
and Midsize Pickups and Utilities – Labor Operation Assignments
for Control Module Reprogramming |
Use
correct labor operation that reflects the module being programmed. |
Don’t
use K5364, which is for reprogramming a transmission control module
(TCM), when reprogramming a TCCM. |
02-04-21-006D
02-06-04-057D |
| 2002-2004 |
Chevrolet
Avalanche and Cadillac Escalade EXT – Cargo Covers and Cladding
Faded or Stained |
Thoroughly
clean, dry and treat components with “Armor-dillo.”
|
Don’t
replace cargo covers for this condition. |
04-08-111-001B |
2001-2004 |
Fullsize
Pickups and Utilities – Servicing Wide Load Mirrors (RPO
DPF) |
Replace
individual parts as needed. |
Don’t
replace complete mirror assembly. |
03-08-64-028 |
|
| return
to Table of Contents |
|
|
| Know-How
Broadcasts for May |
| |
 |
| Know-How
Broadcasts for May |
| 10290.05D
Emerging Issues |
May
12, 2005, 9:00 AM, 12:30 PM, and
3:00 PM Eastern Time |
| New
Model Features and Technology Close-Up seminars |
Stay
tuned! These programs will return soon. Check the Service
Know-How section of the GM Training website (www.gmtraining.com)
for more details. |
| -
Thanks to Tracy Timmerman |
|
|
| return
to Table of Contents |
|
