|
|
Note: Clicking
on any picture or illustration will open a larger version of that art.
|
|
Proper
Terminal Removal Procedures for the Delphi .64 Connection System |
If
you’ve been following the various stories in TechLink about electrical
terminals, you know that over the past few years, numerous new types
of terminal and connector systems have been introduced (TechLink, Sept.
2002, June 2003, Feb. 2004 and Jan. 2005).
In the January issue of TechLink, we reviewed the various suppliers
of .64 terminals now in use in GM vehicles, and the slight differences
between them.
We reviewed the J-35616-64A and the J-35616-65 test probes and the fact
that the J-35616-64A (male) and J-35616-65 (female) test probes are
correctly sized to work with both the round and square styles of .64
terminals.
We reviewed various connector types from various suppliers that use
.64 terminals.
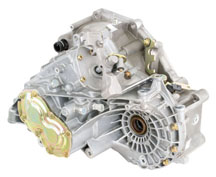
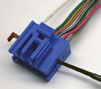
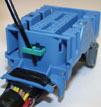
This article is about the proper terminal removal process for Delphi
.64 connector systems (fig. 1), of which
there are five different types. Type 4 (not shown) is not used in North
America at this time.
Type 1
Type 2
Type 3 (hybrid)
Type 5 (Saturn only)
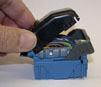
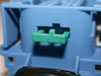
The Wire Dress Cover
On all but Type 1, start the disassembly process by removing the wire
dress cover (if used), which requires a small screwdriver. There are
two popular versions, with one tab (fig. 2)
or two (fig. 3).
After loosening the tab(s), simply rock the cover up and off (fig.
4).
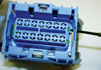
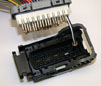
Terminal Position Assurance (TPA)
The next step is removal of the comb style TPA (Terminal Position Assurance).
Be very careful, because the TPA can break very easily (fig.
5), particularly if you try to pry the head of the TPA out of
the connector.
On Type 1 connectors, push the TPA from the end of the connector opposite
the head (fig. 6). This will get the TPA
past the detent that retains it in the connector. Then grasp the head
and pull the TPA out of the connector.
On the other types, use a prying tool to reach inside the connector
to push the TPA loose from the end opposite the head (fig.
7). Once the TPA is loosened, you can use the tool to extract
it through the hole in the connector body (fig.
8).
TIP: On the Type
3, there is no access hole for loosening the TPA. Instead, use the tool
as a lever to pry the TPA loose (fig. 9).
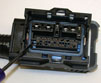
Nose Piece (Type 5 only)
In the Saturn LS only, a 64-way Delphi .64 connection system is used
on a Bosch ECM. For this application only, the Type 5 connector uses
a nose piece that covers the release holes for the terminals (fig.
10).
Pry the nose piece off for access to the TPA, which is similar to the
Type 3. Once it is removed, you can remove the terminals.
TIP: The Type
5 connection system uses a .64 terminal p/n 15410621 found in tray 4
position 24. This is slightly different from all other .64 terminals,
which are p/n 15359541.
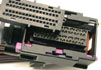
Terminal Removal
For all four connector types, use the 15381651-2 terminal release tool.
Push it into the small hole positioned between the two terminal cavities
(fig. 11). In some small .64 connectors
with one row of terminals, the terminal release hole is just to the
side of the terminal cavity.
Assembly
After replacing the terminal, assemble the connector in the order opposite
to disassembly.
TIP: The TPA
has an lug which must be aligned with the corresponding depression in
the connector (fig. 12). This assures that
the detents on the TPA contact the detents in the connector body, to
retain the TPA.
Recovery
TIP: Do not disassemble
the Delphi connector body beyond removing the dress cover, the TPA and
the nose piece (if equipped).
If for some reason a Delphi .64 connection system has been dissembled
incorrectly (fig. 13), this is the process
for getting it all back together.
Remove all the wires with their terminals from the connector. Reassemble
the connector, leaving the TPA and wire dress cover off. Using the Connector
End View information in SI, reassemble the wires into the connector,
starting with the shortest wires and ending with the longest. Once the
circuits have been correctly placed into the connector, replace the
TPA and dress cover.
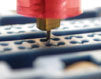
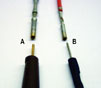
A Final Word About Testing a Round .64 Terminal
The .64 terminal is very small and will not withstand excessive probing,
especially with an incorrect tool (fig. 14).
A J-35616-6 probe with 100 terminal
B J-35616-64A probe with .64 terminal
The ability of the J-35616-64A Test Probe to “hang” in a
round type .64 terminal will be minimal. The drag that you feel is much
less than you’re accustomed to in a larger terminal.
TIP: Square style
.64 terminals will have a much better test probe feel relative to their
size than the round style.
-
Thanks to John Roberts |
|
|
| return
to Table of Contents |
|
|
| Truck
Body Controller Replacement |
This information applies to 2002-04 GMT 360/370 (TrailBlazer, Rainier,
Envoy and Bravada).
If replacing TBC (Truck Body Controller) part number 09352135 with a
TBC part number 15065293, 15114669 or 15122670, you MUST contact Techline
Customer Support Center (800.828.6860) for assistance or the TBC will
be permanently damaged.
TIP: Before programming,
remove LGM/DSM (Liftgate Module/Driver Seat Module) fuse 6 from the
rear fuse block, or programming errors may result.
- Thanks to Craig Jones |
| |
| |
|
|
New Tech 2 Cable |
A
new, more-robust Tech 2 DLC cable is now available for purchase. It
can be obtained from GMDE by ordering GM p/n 3000095.
TIP: Warranty
replacement cables are available on exchange from Vetronix.
These are the improvements:
- Added a "dog-ear clamp" on both connectors to help prevent
the cable from detaching from the connector.
- Improved strain relief by strengthening ribs.
- Reduced hardness of the cable's PVC material. The new cable is more
flexible and forgiving, putting less stress on a given point.
- A new wire “lay” results in a more flexible cable.
-
Thanks to Mark Stesney |
| |
|
return to Table of Contents |
|
| Drain
Plug Sealing Washer |
When
changing the engine oil on the following vehicles, it is necessary to
replace the oil pan drain plug sealing washer. The drain plug sealing
washer, which is part number 94525114, is not reusable. Reusing the
old washer may result in an oil leak.
-
Thanks to John Bowman
2004-06 |
Chevrolet
Aveo |
US
and Canada |
Chevrolet
Epica |
Canada |
Chevrolet
Optra |
Canada |
Pontiac
Wave |
Canada |
|
| |
| return
to Table of Contents |
|
| Floor
Pan Repair |
Owners of some 2000-05 LeSabre,
DeVille, Aurora, or Bonneville vehicles may comment on corrosion in
the floor pan in the area where the battery is located. This may be
caused by acid weeping from the battery, or from a dislodged battery
vent tube. A new repair floor pan kit p/n 88948594 has been released
to assist in the repair of this condition. Refer to Bulletin 05-08-61-002
for repair procedures and part number information.
TIP: Clean the
area of the floor pan where acid may have been present, using a solution
of baking soda and water. Rinse and dry the area thoroughly.
-
Thanks to Bill Denton |
| |
| return
to Table of Contents |
|
| Transmission
Lubricant |
There
are two manual transmissions used in the 2005 Cobalt. The transmission
in the base vehicle (fig. 15) and the transmission
in the SS Supercharged vehicle (fig. 16)
require different lubricants.
-
Thanks to Jerry Garfield
Cobalt |
Getrag
5-Speed Transmission |
Dexron®
III Automatic Trans Lubricant |
Cobalt
SS
Supercharged |
MU3
5-Speed Transmission |
21018899
Manual Trans Fluid |
|
figure
15
|

figure
16
|
| return
to Table of Contents |
|
| 2005
Gasoline Engine Oil Requirements |
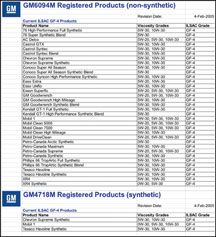
2005 GM gasoline engines require the use of an engine oil that has the
American Petroleum Institute (API) Starburst AND states that it meets
GM Standard GM 6094M (non-synthetic) or GM4718M (synthetic). Failure
to use the recommended engine oil can result in engine damage not covered
by warranty.
Figure 17 is the list of engine oil brands
that meet GM Standard GM 6094M and 4718M as of February 4, 2005.This
list will be updated and will be in the Techlink Reference Guide available
at http://service.gm.com.
-
Thanks to Robert Stockwell and Matthew Snider |
| |
 figure
17 figure
17 |
| |
|
| Driver
Information Center Language Choice |
The
procedure for changing the DIC language on the Colorado/Canyon is correct
in the owner’s and service manuals but some owners apparently
are omitting the last step, which is critical. This has led to unnecessary
warranty claims.
TIP: This information will also apply to the upcoming
Hummer H3.
Before servicing the system, be sure the owner is following this procedure.
1. With the engine off, turn the key to ON.
TIP: You can't
get to the LANGUAGE screen if there are messages on the DIC.
2. Close all doors. Ensure that NONE of the following messages is displayed
in the DIC:
DOORS
PORTES
PUERTAS.
If so, check the doors again.
3. For 2004-05 vehicles, disengage the park brake. Ensure that NONE
of the following messages is displayed in the DIC (Colorado/Canyon only):
PARK BRK
FREIN A MAIN
FRENO DE MANO.
4. Press and release the reset stem until the language is shown on the
DIC display.
5. To view the next available language, press and hold the reset stem
for approximately 2 seconds. Release the reset stem and press and hold
again to view each language. You can choose from English (default),
Spanish or French.
TIP: For 2004-05 vehicles, not all languages are
available. You can choose from English (default) and Spanish for clusters
with miles as the major speedometer scale, or English (default) and
French for clusters with Km as the major speedometer scale.
6. Once the desired language is displayed on the DIC, briefly press
the reset stem to set your choice.
Users are not performing step 6 and are just cycling the ignition once
the language of their choice is displayed.
-
Thanks to Anna West |
|
|
|
| return
to Table of Contents |
|
| SSR
Hydraulic Clutch Bleeding |
The
hydraulic clutch bleeding procedure has been changed for the SSR. Follow
the improved bleeding procedure in SI document 1550985.
The procedure involves using Mity Vac J-35555 and adapter J-43485 to
apply a vacuum to the clutch reservoir. This draws air from the system.
Refer to the document for specifics.
TIP: This procedure
applies to all 2005 and prior passenger cars, light duty trucks, and
T-Series MD Tilt Cab models.
- Thanks to Dan Oden |
| |
| return
to Table of Contents |
|
| HomeLink
Transmitter |
Unlike other GM vehicles, the 2005 LaCrosse (Allure in Canada) must
have the engine running or the ignition key in the run position before
the HomeLink transmitter can be programmed or operated.
TIP: This is
normal operation, and no repair is required.
- Thanks to Wayne Zigler |
| |
|
return
to Table of Contents |
|
| Debris
in Spacer Plate |
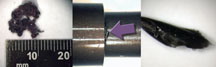
According to bulletin 01-07-30-036D, there are
several reasons for a 4L60E (RPO M30) or 4L65E (RPO M32) transmission
to set a DTC P0756 (2-3 Shift Solenoid Performance).
Two possible causes described in the bulletin are a cracked, broken
or leaking 2-3 shift solenoid and a stuck or hung-up 2-3 shift valve.
Another possible cause is chips or debris (fig.
18) plugging the filtered AFL oil at orifice 29 on the top of
the spacer plate. Because this orifice is so small, it can be plugged
by a very small amount of foreign material.
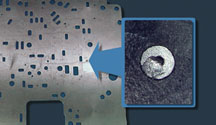
Remove the spacer plate and inspect orifice 29
(fig. 19) and the immediate area for the presence of chips or
debris. Also, inspect the transmission case passage directly above this
orifice and the valve body passage directly below. Clean the area of
any chips or debris found.
-
Thanks to Mike Johnson |
 figure
18 figure
18 |
 figure
19 figure
19 |
|
return
to Table of Contents |
|
| Cold
4th Gear Upshifts |
The
Chevrolet Aveo/Pontiac Wave automatic transmission prevents 4th gear
upshifts when the transmission fluid temperature is below 15°C (59°F).
This is intended to improve vehicle emissions and heater performance.
No corrective action is necessary. Replacing the ECM or TCM will not
correct this condition. Refer to SI document 1339794 for additional
information.
-
Thanks to John Bowman |
| |
|
return
to Table of Contents |
|
| SSR
Center Caps Loose -- Update |
An article in the December 2004 TechLink explained
how to repair center caps that are loose and rotate, then do not align
with the wheel spokes.
This involves adding pieces of polyurethane tape to two opposing legs
of the center cap 180° apart (fig. 20).
According to PIT3196A, the tape is now available by filling out the
template at the bottom of the PI and faxing it to the WPC. The WPC will
send out a service kit that consists of 8 pieces of polyurethane tape
(2 pieces per wheel). The part number of this kit is TAC 306.
-
Thanks to Dan Oden |
figure
20
|
| |
| return
to Table of Contents |
|
| Crankcase
and Subsystem Flushing |
Bulletin
04-06-01-029 was recently released to reinforce GM’s position
on system-flushing tools, equipment and procedures.
Please read the bulletin in detail and observe its contents. Highlights
are mentioned here.
Flushing Not in Maintenance Schedule
In normal usage, GM vehicles do not require additional procedures or
additives beyond what’s presented in the former Vehicle Maintenance
Schedules and the current Simplified Maintenance Schedules. Maintenance
schedules do not call for flushing of engine crankcases, fuel injectors,
A/C lines, radiators, transmission coolers, brake systems, or power
steering systems as a part of regular scheduled maintenance.
TIP: Do not confuse
aftermarket flushing machines with the fluid-changing equipment available
from Kent-Moore/SPX. Fluid-changing equipment is designed to aid and
accelerate fluid changing when required, as part of a specific repair
performed, or when directed to do so in the former Vehicle Maintenance
Schedule or current Simplified Maintenance Schedule.
GM Service Instructions
If a specific model vehicle or powertrain need is identified, GM will
issue an Authorized Service Document specifying the procedure, machine,
tool or chemical needed to accomplish the proper vehicle servicing.
An example of this is fuel injector cleaning, which may be necessary
due to fuel quality in different parts of the country. Under normal
circumstances, though, this is not part of the scheduled maintenance
requirements.
Crankcase Flushing
Crankcase flushing is not endorsed or recommended for any GM gasoline
or diesel engine. Some aftermarket materials for this purpose may be
incompatible with engine components, and may damage some engine seals
and bearings. Damage of this sort is not covered under the new vehicle
warranty.
Other Systems
Other subsystems, such as power steering, A/C, or cooling systems may
be flushed after catastrophic failure or extreme corrosion. Specific
bulletins or procedures in SI exist to cover these conditions. Routine
flushing of these systems is not part of the scheduled maintenance requirements. |
|
|
| return
to Table of Contents |
|
| Opening
Trunk without Lock Cylinder |
These
cars don't have rear compartment (trunk) lid lock cylinders:
2004 1/2 - 05 Monte Carlo
2005 LaCrosse/Allure
2005 Grand Prix
2005 Cadillac STS
The following procedures explain how to open the lid on these vehicles
in case of an electrical fault that prevents opening the lid with the
remote keyless transmitter or the interior release switch.
With fold-down rear seat back:
Fold down the seat back. Using a long tool that will reach the rear
compartment latch, operate the release handle and open the lid.
With rear seat back-to-rear compartment access door:
Fold down the access door. Using a long tool that will reach the rear
compartment latch, operate the release handle and open the lid.
Without fold-down rear seat back or access door:
Remove the rear seat cushion, seat back and rear compartment-to-seat
back panel. Using a long tool that will reach the rear compartment latch,
operate the release handle and open the lid.
-
Thanks to the GM SPO Interior Partition |
|
|
| |
| return
to Table of Contents |
|
| Hidden
I/P Trim Screw |
On
the 2005 Buick LaCrosse (Allure in Canada), the instrument panel trim
plate bezel is retained by four clips, one nut and one screw (fig.
21). These are shown in SI document 1538590.
A Trim plate
B Clip
C Nut
D Hidden screw (access behind striker)
Open the IP compartment door and release the check strap. Refer to SI
document 1538593 for procedures.
Use a 10mm socket and extension to remove the hidden screw through the
access hole behind the door latch striker (SI document 1538602, item
4).
TIP: If this
hidden screw is not removed, the trim plate bezel will be damaged.
- Thanks to Wayne Zigler |
figure
21 |
|
return
to Table of Contents |
|
| Roof
Beacon Switch Indicator |
A
2003-05 Chevrolet or GMC Full Size Truck equipped with VYU option (Snow
Plow Provision Package) may not have the roof beacon light connected.
If the customer inadvertently presses the roof beacon switch to the
ON position, the roof beacon indicator will illuminate on the switch.
If the ignition is turned off and the beacon switch is left on, a battery
draw (140 Ma) will occur, evantually causing battery discharge.
The roof beacon switch indicator will not illuminate when the key is
turned off. However, the roof beacon relay is still energized. It's
suggested that the roof beacon switch be turned off before turning the
ignition off to avoid a battery drain.
TIP: If the roof
beacon is not being used, pull the SEO B1 fuse to disable the relay.
This can be done on all vehicles with VYU option except vehicles equipped
with option 8S8 (Speedometer Security) or have an overhead universal
garage door opener.
-
Thanks to Jim Will |
| |
| return
to Table of Contents |
|
| Console
Cupholder and Ashtray |
Owners
of some 2003 -05 GMC Sierra Denali, Yukon Denali/XL and Cadillac Escalade/EXT/ESV
may comment that the center console cupholder and ashtray lid will not
close.
When opening the cover, customers may be incorrectly pulling up on the
cover as opposed to pushing down on the cover to let the automatic release
work properly. During the pull-up motion of the cover, an over-design
force is applied, causing the latch to be pulled out of the retainer
while it is in the lock position.
Replace the latch assembly with p/n 89040109, as well as both the ashtray
door and cupholder door latches. This will eliminate the customer returning
with the same condition.
TIP: Do not re-use
any latch that has become loose. Do not replace the lower bezel assembly.
If the latch is missing during diagnostics, inspect the area inside
the lower console and remove the broken latches, to prevent squeaks
and rattles.
-
Thanks to Jim Will |
| |
| return
to Table of Contents |
|
| Dome
Light Liftgate Operation |
Owners
of some 2005 Chevrolet Equinoxes may comment that intermittently the
dome light does not turn on when the liftgate is opened. This will usually
happen after the vehicle sits for an extended period of time. If the
liftgate is opened after all the modules go to sleep, the dome light
will not come on. The liftgate ajar switch input to the BCM will not
wake up the BCM once it has gone to sleep, so the dome light will not
come on. Once the BCM gets an input to wake it up (from RKE or door
handle), the dome light will turn on when the liftgate is opened.
This is normal operation and no repairs should be made.
-
Thanks to Ron Erman |
| |
| return
to Table of Contents |
|
| Voltmeter
Fluctuation |
Some
customers may comment that their instrument panel voltmeter is fluctuating
between 12 and 14 volts on their new 2005 model year light duty full
size pickup/utility vehicle.
For 2005 model year, light duty full size pickups and utilities, are
equipped with a new Regulated Voltage Control (RVC) system, covered
in the September 2004 TechLink. The RVC system allows changes to vehicle
voltage, up or down, under various scenarios. Battery state of charge
and the vehicle’s present electrical needs are only two of numerous
conditions taken into account.
This will cause the voltmeter to fluctuate between 12 and 14 volts.
By comparison, conventional systems usually maintain a more consistent
reading of 14 volts.
This fluctuation with the RVC system is normal system operation and
no repairs should be attempted.
-
Thanks to Jim Will |
| |
| return
to Table of Contents |
|
| Fifth
Wheel Trailering |
The
2004-05 Chevrolet Silverado and GMC Sierra C/K 1500 Crew Cab with 5'
8" bed is not recommended for fifth wheel trailering.
With a cab-to-axle (CA) distance of 32 inches, there is no available
fifth wheel hitch that will allow the truck and trailer to approach
90° articulation. This means that in parking lot maneuvers and sharp
turns, there will eventually be contact between cab and trailer, and
damage will result to one or both vehicles.
TIP: A CA distance
of at least 52 inches is best (with 8 foot box) for fifth wheel trailing.
The extended pins and sliding 5th wheels were developed in the 1990s
to accommodate short box (6' 6") models with 38 inch CA lengths,
but that is the lower limit.
-
Thanks to Jim Will |
| |
| return
to Table of Contents |
|
| Upper
Radiator Hose Coolant Leak |
On
some 2004-05 Chevrolet Express and GMC Savana vehicles, the upper radiator
hose may have a coolant leak, because it has rubbed through on the fan
shroud.
If the upper radiator hose (p/n 25757841) needs to be replaced, it will
be necessary to cut 50mm (1.9 in.) off the radiator end of the hose.
This will prevent the upper radiator hose from rubbing on the fan shroud.
-
Thanks to Ron Erman |
| |
| return
to Table of Contents |
|
| Corvette
I/P Compartment Door |
Owners
of some 2005 Corvettes may comment that the I/P compartment door appears
warped and extends outward near the center IP. This may be caused by
the torque sequence when the door is installed by the plant.
To correct the condition, loosen the attaching screws at the bottom
of the door. Then retighten the screws, beginning with the outboard
screw, the one on the right side and then the inboard screws.
-
Thanks to Paul Radzwilowicz |
| |
| return
to Table of Contents |
|
 Car Issues
— Fix It Right the First Time (new issues in bold) Car Issues
— Fix It Right the First Time (new issues in bold) |
Model
Year(s) |
Vehicle
Line(s) --
Condition |
Do
This |
Don’t
Do This |
Reference
Information / Bulletin |
2005 |
Equinox
LT/LS (AWD Only) – Moan, Bind or Growl Coming from Rear
during Low Speed Parking Lot Turns |
Replace
RDM coupling (clutch pack) with proper sealers. Fill with Versatrak
fluid. |
Don’t
replace complete rear drive module. |
04-04-20-004 |
2005 |
Cobalt
(Built Before 01-17-05) – Fuel Gauge May Not Go Completely
to Full |
Recalibrate
ECM with updated calibration, version 1.75. |
Don’t
replace fuel module, fuel level sensor assembly or fuel gauge. |
05-08-49-002A
|
2003-2004 |
Cavalier,
Sunfire – HVAC Control Head, Difficult to Adjust the Mode
Dial |
Replace
foam delaminated from mode door which can cause
bind condition. |
Don’t
replace HVAC control head, module or cables, unless damaged. |
03-01-38-005B
|
2002-2005 |
Cars
and Trucks – Multiple Driveability Symptoms/Clogged Fuel
Injectors |
Clean
fuel injectors as described in Bulletin. |
Don’t
replace fuel injectors. |
03-06-04-030A |
2004-2005 |
Grand
Prix – Outside Rearview Mirrors |
Replace
glass or motor, whichever is defective. |
Don’t
replace complete mirror assembly. |
04-08-64-009 |
2004 |
Grand
Prix – Steering, Suspension or Cradle Click Noise |
Install
new two-piece sleeve and spacer to steering gear mounts. |
Don’t
replace steering gear or cradle. |
03-02-32-048A |
2000-2003 |
Century,
Regal, Lumina, Impala, Monte Carlo, Grand Prix, Intrigue with
3.8L L36 Engine – Coolant Leak |
Replace
upper intake manifold gasket only. |
Don’t
replace upper intake manifold assembly for coolant leak condition. |
03-06-01-016 |
2001-2004 |
Aztek
(01-04), Rendezvous (FWD, 02-04), Venture/Montana/Silhouette (01-04)
– Pop and/or Rattle in Exhaust Down Pipe |
Follow
procedure in bulletin using clamp P/N on down pipe to correct
rattle/buzz noise. |
Don’t
replace converter assembly for rattle/buzz noise without completing
instructions in bulletin. |
03-06-05-003
|
2000-2004 |
Cavalier/Sunfire/Alero/Grand
Am – Inoperative Sunroof Module |
Retime
module or replace only motor. |
Don’t
replace entire sunroof module assembly. |
03-08-67-009A |
1999-2004 |
All
Cars and Trucks – Brake Warranty, Service and Procedures |
Issue
One: Refinish brake rotor.
Issue Two: Measure for LRO |
Issue One: Don’t replace brake rotors.
Issue Two: Don’t measure for LRO |
00-05-22-002D |
|
| return
to Table of Contents |
|
|
 Truck
Issues — Fix It Right the First Time
(new issues in bold) Truck
Issues — Fix It Right the First Time
(new issues in bold)
|
Model
Year(s) |
Vehicle
Line(s) --
Condition |
Do
This |
Don’t
Do This |
Reference
Information / Bulletin |
2002-2005 |
Tahoe, Suburban, All Yukons, All Escalades, Avalanche, H2 –
Exhaust Pop/Ping Noise |
Replace
heat shield. |
Don’t
replace exhaust system. |
03-06-05-008B |
2005 |
All Escalades, Tahoe, All Yukons, Suburban, Avalanche, All TrailBlazers,
All Envoys – Adjustable Pedals Don’t Recall Preset
Positions and/or Front Heated Seats Turn Off After 30_Seconds |
Replace
brake pedal position switch. |
Don’t
replace brake pedal assembly. |
05-08-143-001 |
2003-2005 |
Full Size Pickups and Utilities – Snap/Popping Noise from
Front of Vehicle |
Slot
left side mounting holes on front crossmember using procedure
in Bulletin. |
Don’t
replace crossmember. |
03-08-61-002B |
2002-2004 |
Chevrolet
Silverado, GMC Sierra – Accumulator/Accumulator Bracket |
Replace
accumulator and/or accumulator bracket. |
Don’t
replace compressor. |
02-01-38-007C |
2004 |
Tahoe, Suburban, Silverado, Yukon, Yukon XL, Sierra, Escalade,
Escalade EXT, Escalade ESV, H2 – Passenger Door Module and
RKE Inoperative |
Re-flash
passenger door module. |
Don’t
replace passenger door module. |
04-08-52-005 |
2001-2003 |
Fullsize
Pickups – Injector Replacement for High Flow Rates |
Use
Corporate Bulletin Number 04-06-04-007A for injectors with high
fuel return rates. Use Special Policy 04039 for all 01-02 vehicles. |
Don’t
replace 8 injectors for complaint other than high fuel return
rates. All other injector failures are fix as failed. |
|
| 2004-2005 |
All
Cars and Trucks – State-of-Charge Upon Delivery of a New Vehicle |
Check
battery’s state-of-charge per revised PDI procedure using
Tester, J 42000 or J 42000-EU. |
Don’t
remove and replace battery. |
02-06-03-009A |
| 2002-2004 |
Fullsize
and Midsize Pickups and Utilities – Labor Operation Assignments
for Control Module Reprogramming |
When
submitting claims for reprogramming an electronic module, use correct
labor operation that reflects the module being programmed. |
Do
not use K5364, which is for reprogramming transmission control module
(TCM), when reprogramming TCCM. |
02-04-21-006D
02-06-04-057D |
| 2002-2004 |
Chevrolet
Avalanche and Cadillac Escalade EXT – Cargo Covers and Cladding
Faded or Stained |
Thoroughly
clean, dry and treat components with “Armor-dillo.”
|
Don’t
replace cargo covers for this condition. |
04-08-111-001B |
2001-2004 |
Fullsize
Pickups and Utilities – Servicing Wide Load Mirrors (RPO
DPF) |
Replace
individual parts as needed. |
Don’t
replace complete mirror assembly. |
03-08-64-028 |
|
| return
to Table of Contents |
|
|
| Know-How
Broadcasts for April |
| |
 |
| Know-How
Broadcasts for April |
| 10290.04D
Emerging Issues |
April
14, 2005, 9:00 AM, 12:30 PM, and
3:00 PM Eastern Time |
| New
Model Features and Technology Close-Up seminars |
Stay
tuned! These programs will return soon. Check the Service
Know-How section of the GM Training website (www.gmtraining.com)
for more details. |
| -
Thanks to Tracy Timmerman |
|
|
| return
to Table of Contents |
|


 figure
4
figure
4
 figure
6
figure
6
 figure
14
figure
14