
| Note: Click a picture or illustration in the left column to view a large version in the article. To hide the large version, simply click on it. |


|
||
Getting the Most from PIs
|
To get the latest technical information to you quickly, the Technical Assistance Center (TAC) uses a document called Preliminary Information (PI). The typical PI contains the description of a condition, the affected vehicles, and a resolution or repair. TIP: The only place PIs appear is on the Service Information (SI) website. Here’s some background about how PIs are developed, and some tips for getting the most from them. Regardless of where the information about an issue originates, it is reviewed by Brand Quality and TAC before the decision is made publish a PI. Compared with the process for creating a Service Bulletin, the PI process is streamlined. Ideally, a PI can be posted within 24 hour of the issue becoming known. Brand Quality reviews PIs on a regular basis, and when it’s appropriate, a Service Bulletin may be developed from a PI. PI Designations The PI number is prefaced by one of three designations: PIP for powertrain issues PIC for car issues PIT for truck issues Using PIs Effectively When you’re on the SI website home page, look at the directory. The third option button says: See the newest bulletins, campaigns and preliminary information in Latest News. Click on this button to see a listing of the newest documents that have been posted. TIP: You can change the time period covered by this list by selecting a number between 1 and 8 weeks. You can also customize the list to cover all vehicles or a specific brand, using the pulldown menu. Scroll down the display and you will find listings for Bulletins and Campaigns, followed by Preliminary Information. TIP: You should review this list daily to be sure you’re always aware of the latest information. If you proceed to “build” a vehicle and go to the Service Manual/Bulletins section, you will find a list of the PIs that apply to the vehicle specified. Several other ways to locate relevant PIs is to use the SI keyword search or to specify a VIN. TIP: Always review the model list in the PI to be sure the PI applies to the vehicle that you are working on. For example, three different engine RPO codes may be available for the vehicle you are working on, but the PI may apply only to vehicles with a specific engine RPO code. Typically, if the PI applies only to vehicles with a specific RPO code, it will be listed in the model list, directly under the model years and models. - Thanks to Jack McVoy |
|
|
||
CANdi Module Warranty figure 6 |
Effective immediately, all CANdi modules (fig. 6) that are no longer covered under the original manufacturer’s two year warranty will incur a $210 charge for repairs ($283 Canada). The repair charge includes a 90 day repair warranty.
Customers whose units are out of warranty can choose the repair charge or opt to purchase a new unit. If a unit is sent for repair and no problem is found, a $45 charge covers diagnosis service and software upgrades ($58.50 Canada). An express exchange is available for $250 ($325 Canada). This includes overnight shipment. The original CANdi unit must returned or the dealer will be charged for two and will no longer be eligible for the Express Exchange program. TIP: Similarly, if a customer does not return a Tech 2 core unit, they will no longer be eligible for the Tech 2 Express Exchange program. All sales for the new CANdi modules will be directed to Dealer Equipment/GM Tools. - Thanks to Tammy Esposito, ETAS |
|
|
||
Fuel Level Sending Units
|
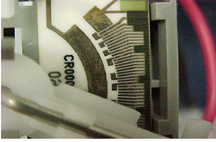
Operation of a typical in-tank fuel level sending unit is based on variable resistance. As the float moves up or down according to fuel level, the resistance in the sending unit varies. This varying resistance is processed by the engine control module (ECM) and the resulting information is sent to the instrument panel cluster (IPC) for display on the fuel gauge. In the past, the sending unit was set up so that high resistance indicated high fuel level, and low resistance indicated low fuel level. Sulfur contaminants found in some of today’s gasolines can form deposits on the sending unit (fig. 7), resulting in higher-than-intended resistance (TechLink, Jan. 2006). The high resistance from the deposits could be misinterpreted as a high fuel level, when in fact the fuel level is low. The driver may run out of fuel, even though the fuel gauge is not indicating low or empty. To offset this effect, engineering has begun “flipping” fuel senders, reversing the circuitry. This means that high resistance now indicates low fuel level and low resistance indicates high fuel level. So, if deposit build-up adds to sender resistance, the gauge will err in the direction of indicating less fuel than is actually in the tank. The “flipping” process began in the 2004 model year continued through model years 2005-06. The remaining vehicles will have their fuel level sending units “flipped” for the 2007 model year. - Cadillac CTS - Cadillac SRX - Cadillac STS - Cadillac XLR - Chevrolet Corvette - Chevrolet Impala, Monte Carlo - Chevrolet Malibu, Maxx - Pontiac Grand Prix - Buick LaCrosse (Allure) TIP: When diagnosing fuel sender operation, it’s critical to refer to the appropriate model year information in SI, to be sure which resistance specifications apply. TIP: GMSPO offers GM Fuel System Treatment PLUS p/n 88861011 (88861012 in Canada) which helps protect fuel sending units from contaminating deposits. - Thanks to Len Tillard |
|

|
||
| Door Trim Panel Removal |
On the Buick Lucerne, here’s an important step to prevent damage to the armrest clip openings when removing the front door trim panel. |
|
|
||
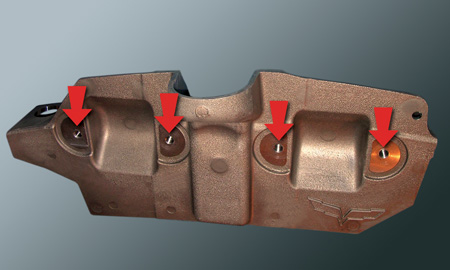
| This information applies to the 2004-06 Chevrolet Malibu, 2005-06 Pontiac G6, 2007 GMC Acadia and Saturn Outlook. These vehicles do not have a service part released for the shift control indicator illumination bulb. To prevent customer dissatisfaction and to provide a cost-effective repair, a generally available bulb Osram Sylvania 2723 can be used as a replacement on these vehicles. A bulb with a GM part number will be listed in the GMSPO catalog in the near future. - Thanks to David MacGillis |
||
|
||
| Wheel Weights |
Recent dealer feedback indicates wheel marring issues from using non-OEM wheel weights. Bulletins have recently been published to both Service Managers and Parts Managers in an effort to increase awareness and teamwork in the area of wheel appearance related to weight usage, including different ways of ordering weights. Refer to Service Bulletin number 06-03-10-004 and Parts Bulletin number GMP06-051. - Thanks to Doug Ritter |
|
|
||
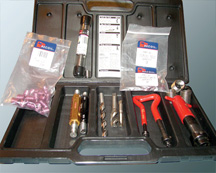
Diesel Fuel Filter Kit
|
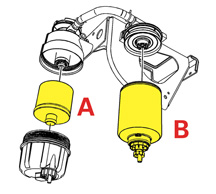
A new fuel filter kit has been developed for the 2006 Chevrolet Express and GMC Savana vans with 6.6L diesel engine.
When servicing the fuel filters on these vans, both fuel filters need to be replaced (fig. 8). The fuel filter kit p/n 19149845 includes a cartridge style filter (A) located in the diesel fuel conditioning module (DFCM), a screw-on style fuel filter (B) and the necessary seals. - Thanks to Don Langer |
|

|
||
Fuel Filler “Flapper” |
The fuel filler pipe has been redesigned for the 2006 model year to eliminate the spring loaded steel “flapper.” The new design will be phased in when the existing stock is used up. |
|
|
||
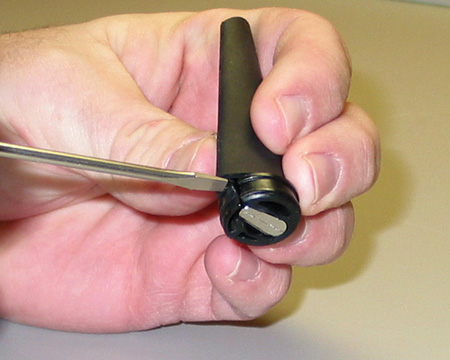
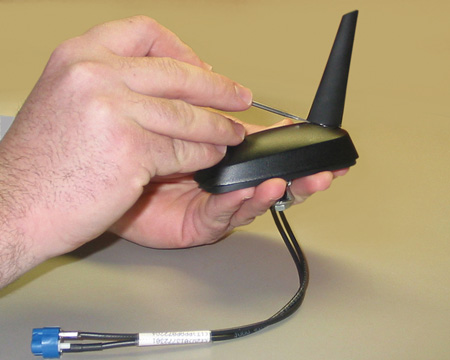
OnStar and XM Antenna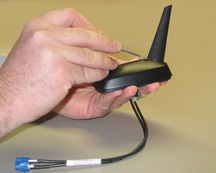 figure 9  figure 10 |
A new OnStar or combination OnStar/XM antenna is being used on a wide variety of vehicles in 2006. If the improper procedure is used to remove the mast, the base may be broken or the mast may be gouged. A hidden locking tab must be depressed to remove the mast from the antenna base (fig. 9 and 10). Insert a small screwdriver between the mast and the base to depress the locking tab while turning the mast to unthread it from the base. - Thanks to Jim Hughes |
|
|
||
Door Trim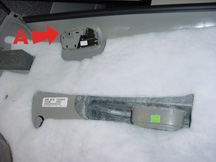 figure 11 |
This information applies to 2005 Chevrolet Cobalt and Pontiac Pursuit. (2006 and later models are not affected.)
When removing the inside release handle (fig. 11), be sure to remove the door trim panel first. Many of these vehicles have a small amount of hot-melt adhesive applied to the back surface of the door trim. Remove this adhesive before attempting to remove the release handle. Failure to do so will result in damage to the door trim. TIP: It is not necessary to apply adhesive to the inside release handle. This application was for manufacturing purposes only and the release handle may be installed without adhesive. - Thanks to Ed Kay |
|

|
||
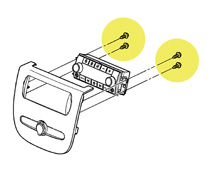
On the 2007 full-size utilities, the Rear Seat Audio Control Module is attached to the compartment bezel with 4 fasteners (fig. 12). If the fasteners on one side of the module are tightened before the other side, there is a high probability that the module wll not seat correctly. |
||

|
||
Outside Temperature Display |
On a Corvette, the climate control readout may display an outside temperature reading that does not represent the actual outside temperature. |
|
|
||
“Ice Possible” Message |
The Corvette driver information center may display an Ice Possible message when the outside temperature is not cold enough for ice to form. |
|
|
||
Fuel Pump Shutoff |
Owners of some Sierra, Silverado, and full-size utility vehicles (all years) may comment that, when refueling at certain fuel stations, the fuel pump shuts off before the fuel tank is completely filled. This is not a fault with the GM fuel system. It is an industry-wide issue with variations in OPW 11B fuel nozzles. Until the fuel station industry replaces these defective nozzles, advise customers with this concern to try either a different pump or a different fuel station. - Thanks to Tom Mannering |
|
|
||
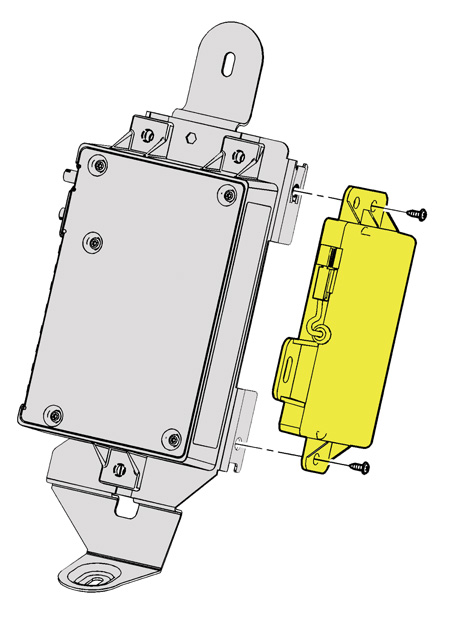
| This information applies only to the 2006 Chevrolet Impala and Monte Carlo with OnStar. Impalas built after November 24 and Monte Carlos built after December 19 are equipped with an OnStar Backup Battery (BUB) (fig. 13).
The BUB is a non-rechargeable, lithium battery with a lifespan of approximately 4 years and is designed to maintain an open circuit voltage between 16V and 9V throughout this period. This allows the battery to power the basic functions of the VCIM for least one 200-second (5 minute) phone call at the end of the 4 year span, should a main vehicle battery loss occur. The BUB voltage is checked every ignition cycle. If the BUB fails the check or if the BUB has had current drawn from it, the OnStar LED next to the control buttons changes from green to red and a DTC is set, either B1446 or B1447. Service Precaution Do not disconnect the vehicle battery with the ignition key in the run position. With the ignition key in the Run position, the OnStar module is awake on the data bus. If the vehicle battery is disconnected with the key in Run, the OnStar module senses a vehicle power failure, as could occur in a crash, and draws current from the BUB. When the vehicle battery is reconnected, the OnStar LED is red and a DTC is set. Because the BUB has had a current drain and there is no way of telling how long the drain was, the BUB must be replaced. Refer to Accessories in SI for OnStar battery replacement information. - Thanks to Amy Sutherland and Howard Owens |
||

|
||
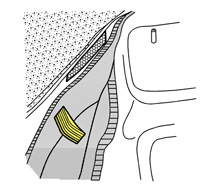
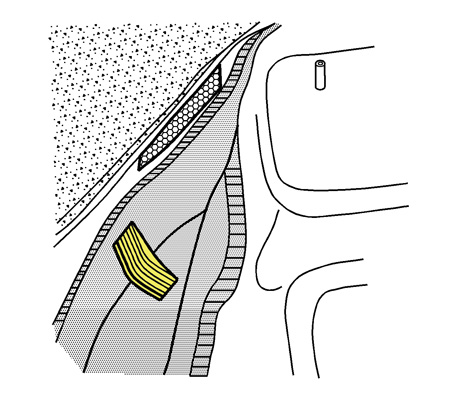
| Owners of some 2004-06 Chevrolet SSRs may comment about the way the carpet fits in the following three areas: - Carpet pulls out from under the left hand side of the console. - Carpet fit around the gauge package in front of the console. - Carpet fit on the floor next to the hinge pillar trim (kick pad). Bulletin 06-08-110-001 was recently released to address these concerns. It calls for the installation of the Deadener Kit - Floor Panel p/n 15878744. For the console concerns, the bulletin explains how to remove the console for access to the locations where a “shoddy pad” and Velcro strips from the kit are installed (fig. 14). For the kick pad concern, the bulletin explains how to lift up on the front of the sill plate, remove the hinge pillar trim and install a piece of “shoddy pad” between the carpet and the floor (fig. 15). Refer to the bulletin for details, illustratrations and applicable labor time. - Thanks to Dan Oden |
||

|
||
Movement in PARK |
This information applies to 2007 and prior passenger cars and light duty trucks equipped with automatic transmission. Some vehicles may move slightly forward or reverse while in Park at start up after a cold soak and may be accompanied by a clunk noise. The movement is due to the residual transmission fluid in the clutch packs that creates a partial apply on start up. The movement is stopped by the parking pawl and/or transmission fluid exhausting completely from the clutch packs. This slight movement has no adverse effect on the transmission and no repair should be attempted. This condition is normal and can be verified by comparing with another identically built vehicle under the same cold conditions. TIP: To prevent this condition from occurring, the parking brake should be used according to Owner Manual recommendations anytime the vehicle is parked. - Thanks to Rusty Sampsel |
|
|
||
SSR Instrument Cluster |
When replacing the instrument cluster on a 2003-06 Chevrolet SSR, you must remove the bezel, lens and three rubber plugs from the old cluster. The new cluster is shipped with a TrailBlazer lens and bezel. Remove the lens and bezel by unlocking the four plastic tabs. Install the three rubber plugs, lens and bezel removed from the SSR cluster before putting the new cluster into the vehicle. TIP: Be sure to install the plugs, to avoid light leaks. TIP: Don’t order the complete cluster to obtain parts. They are available individually. - Thanks to Dan Oden |
|
|
||
Intermittent Instrument Cluster |
Owners of some 2000-05 Cadillac DeVilles with the Digital Instrument Cluster (RPO U02) may comment that the instrument panel cluster display is either erratic or inoperative ("logic lock") on an intermittent basis. During diagnostics, multiple U-codes may be observed on the scan tool. The cause is a software anomaly within the I/P cluster communication chip. To correct the condition, reprogram the IPC using the latest calibration available in TIS. For further details, refer to SI document 1785490, issued March 14, 2006. - Thanks to Bill Denton |
|
|
||
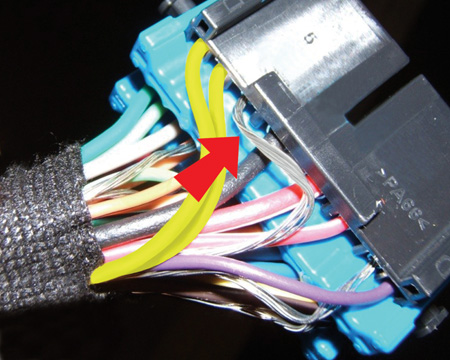
| Some owners of the 2007 Chevrolet Tahoe, GMC Yukon and Cadiliac Escalade (with RPO UQA or UQS) may have a concern with a buzz, whine, distortion, pop, or static noise coming from any speaker.
Inspect for contact between the radio low level signal drain wires (fig. 16) and any adjacent terminal at Connector C211. The drain wires are bare and may have excessive length that can allow them to contact adjacent terminals on the back side of the connector. This can be corrected by pulling back unnecessary slack in the drain wires and securing them with electrical tape. - Thanks to Paul Radzwilowicz |
||

|
||
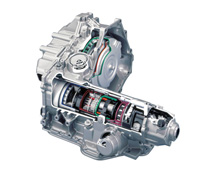
| Valve bodies continue to represent a high frequency replacement item on the 4T65E transmission (fig. 17) used in 2001-06 vehicles. To reduce the number of no-problem-found valve bodies returned to the WPC, perform the following before replacing the valve body.
TIP: Refer to Bulletin 02-07-30-013E to improve diagnosis and correction of the shift concern with the least amount of customer inconvenience. Depending upon customer concern, refer to the chart listed in the bulletin to help identify the valve body circuit that may be contributing to the shift concern. Use the valve nomenclature chart to identify the restricted and/or stuck valve. TIP: Use both the nomenclature and the valve number when documenting the results on the repair order. IMPORTANT: Perform a visual inspection of the valve body cavities and perform the following. Check Valve Movement With the valve body on the workbench, carefully push the valve against spring pressure to see if valve snaps back to its original position. If the valve is seated in home position, carefully pry the valve off its seat with a small flat blade screwdriver. Quickly remove the screwdriver and allow the valve to return to its seat. In either case, if the valve does not snap back freely, remove the valve from the valve body. Check for Scratching or Scoring Inspect the valve for scratching or scoring. If any is found, perform the fingernail test. Move your fingernail over scratches and scores. If the nail catches, replace the valve body. TIP: In most cases, the scratches are not severe enough to catch your fingernail. Cleaning If the valve is serviceable, clean it with contact or brake cleaner. Also clean the bore. TIP: Clean the bores with the machined side of the valve body down so debris may escape. Blow with shop air. Final Check To verify free movement of the valve, dip the valve into clean ATF and install it into the appropriate bore. The valve should move freely. If the valve moves freely, in most cases the valve body will function properly when reinstalled. Reassemble and retest. - Thanks to Ron Mitchell |
||

|
||
Exhaust Flow Control Module |
This information applies to the 2006 Cadillac XLR and XLR-V and Chevrolet Corvette C6 and Z06. |
|
|
||
Goodwrench Engine Instructions |
This information applies to the 2002-04 Chevrolet Malibu Classic, Oldsmobile Alero and Pontiac Grand Am with 2.2L Engine (VIN F - RPO L61) and Automatic Transmission
On all J-car applications, swap the oil pan from existing engine or use part number 12599237. |
|
|
||||||||||
Rear Axle Whine or Growl |
On the 2006 Hummer H3, rear axle gear whine and/or bearing growl may occur during both drive and coast conditions, and gets louder with higher speeds. This condition usually begins at 300 to 500 miles, and worsens with additional miles.
|
|||||||||
|
||
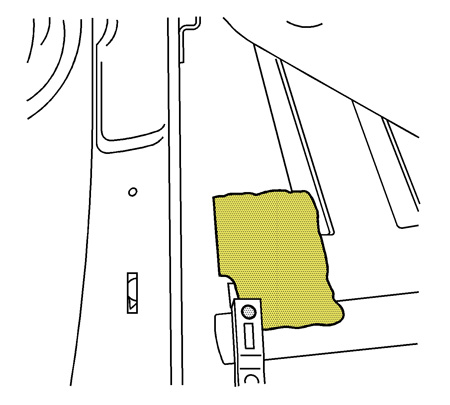
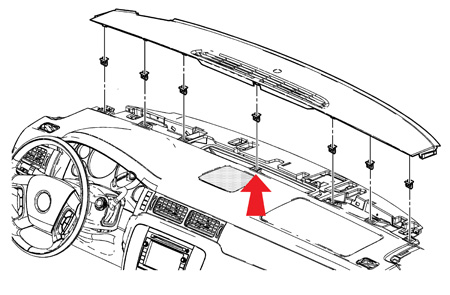
Loose Instrument Panel Upper Trim Panel
|
Owners of some 2007 Cadillac Escalade, Chevrolet Tahoe, and GMC Yukon vehicles may comment that the Instrument Panel Upper Trim Panel appears to be lifting or seems loose in the area of the windshield defroster grille or at the ends of the trim panel. TIP: Don't remove the mylar tape from any other clip locating hole. |
|

|
||
Slipping, Late or Missed Shifts |
The 4L60E/4L65E automatic transmission used on 2003-07 cars and trucks may experience a condition of slipping, late or missed shifts in 2nd, 3rd and 4th. An internal transmission disassembly may reveal a 2-4 band and/or a 3-4 clutch being distressed. |
|
|
|||||||||||||||||||||||||||||||||||||||||||||||||||||||
|
|||||||||||||||||||||||||||||||||||||||||||||||||||||||
|

|
|||||||||||||||||||||||||||||||||||||||||||||
|
|||||||||||||||||||||||||||||||||||||||||||||
|
 Truck Issues — Fix It Right the
First Time
Truck Issues — Fix It Right the
First Time
|
||||||||||||||||||||||||||||||
|
||||||||||||||||||||||||||||||
|
 Powertrain Issues — Fix It Right the
First Time
Powertrain Issues — Fix It Right the
First Time
|
|||||||||||
Know-How Broadcasts for June
|
|
||||||||||
|
|||||||||||
