|
|
Note: Clicking
on any picture or illustration will open a larger version of that art.
|
|
Performance
Tires |
A
number of General Motors’ high performance models come factory
equipped with tires optimized for dry road performance (fig.
1). As a result, the tread life characteristics of these tires
may be reduced to achieve higher performance levels. Tread life of high
performance tires may be half that of a typical all-season tire, or
less. Individual driving behavior will also affect ultimate wear performance.
To prolong the life of these tires, tire rotation is recommended at
3,000 mile (4828 km) intervals.
TIP: Tires cannot be rotated if they are different
sizes, front and rear. If unsure, chech the owner’s manual.
TIP: For 2005,
performance tires are installed on Chevrolet Corvette and certain applications
of Chevrolet Cobalt, Cadillac CTS and STS, and Pontiac Grand Prix.
Inflation pressure is very important and should be checked at least
monthly. Tires should be checked cold, and should be adjusted to the
pressure on the vehicle's tire placard, NOT the max pressure on the
tire's sidewall.
Underinflation will increase tire wear, decrease fuel economy, and decrease
load carrying capacity. Overinflation will result in a harsh ride. Either
can adversely affect handling.
TIP: If a vehicle
has been parked for some time, the tires may develop a temporary flat
spot. This may result in a vibration until the tires are warmed up,
which may take up to 10 miles of driving.
GM has developed and matched specific tires for each vehicle. The original
equipment tires installed on the vehicle, when it was new, were designed
to meet General Motors’ Tire Performance Criteria Specification
(TPC Spec) requirements. GM strongly recommends replacement tires with
the same TPC Spec rating. This way, the vehicle will continue to have
tires that are designed to give the same performance and vehicle safety,
during normal use, as the original tires.
In winter climates where snowfall may be significant, these performance
tires will provide less traction than typical all-season tires. Winter
tires are an available alternative that may greatly enhance winter driving.
If tires are replaced with non-TPC Spec tires, such as winter tires,
in all cases, all four tires must be replaced. They must be the same
size, load range, speed rating and construction type (radial and bias-belted
tires) as the vehicle’s original tires.
-
Thanks to Richard Gratz, Milford Proving Ground |

figure 1 |
| return
to Table of Contents |
|
|
| Tech
2 Pathing Tables |
These handy Tech 2 quick reference Pathing Tables are now available
on the TechLink website, under the Reference Guides tab. They will no
longer be printed on cards.
You can use the Pathing Tables to quickly locate items such as data,
input/output controls and service programming on your Tech 2. These
tables are a must for anyone performing diagnostic procedures on current
and future GM vehicles utilizing GM LAN and Class 2 protocols.
An important benefit of presenting the tables on the web is the ability
to search. The contents are arranged alphabetically, beginning with
the end result -- the final “string” displayed on the Tech
2 screen. There’s an alphabet across the top of each page (fig.
2). Click on the appropriate letter to be taken to that portion
of the Pathing Table.
You can also search for a specific end string by clicking the binocular
“find” icon, and typing in the exact phrase.
You’ll also notice color coding for Powertrain (green), Chassis
(blue) and Body (red), to further help you find what you’re looking
for.
For your convenience, there are buttons at the bottom of each page to
take you to the next page or back to the beginning. Simply position
the pointing finger over the desired word and click.
Use the % pulldown menu or the + and - buttons to enlarge or reduce
the size of the display as desired.
And finally, you can use the outstretched hand symbol to navigate within
a page. Click and drag, and the symbol “grasps” the page,
enabling you to move it in the desired direction.
- Thanks to Abra Quintero and Mark Stesney |
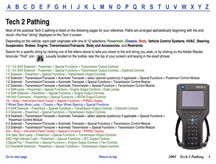
figure 2 |
|
|
|
|
Corvette Service Notes |
Brake
Pads
For 2006, a new brake pad is introduced on the Z51 Corvettes for reduced
operating noise. It is quieter than the pad used in 2005.
TIP: Use European
specification brake pads for autocross competition. However, operating
noise will be noticed with these pads.
Car Wash
The Z06 may not fit on some car washes due to the use of wider tires
(rear tires are 13.6 inches, 325 mm, on 12-inch wheels). An information
hang tag is included on the gearshift lever (fig.
3).
VIN
After the first 140 Corvette Z06s were built with a VIN Y designation
for the engine, it was changed to VIN E. The LS7 engine is installed
in all of the cars.
TIP: For these
first 140 vehicles, it is necessary to use the letter E (instead of
the Y on the plate) (fig. 4) when specifying
the vehicle in SI and on the Tech 2.
-
Thanks to Brad Thacher |
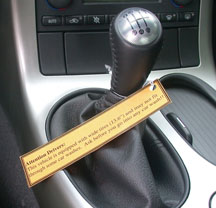
figure 3 |
|

figure
4
|
|
return
to Table of Contents |
|
| Windnoise
Diagnosis Guide for SSR |
Bulletin 05-08-58-003 has been released to help diagnose the following
windnoise conditions in the 2003-05 Chevrolet SSR (fig.
5).
- Windnoise from the side and rear edge of the tonneau cover.
- Windnoise around the door glass.
- Windnoise from the weatherstrip joints.
- Leak in the rear corner between the front roof panel and seal.
- Windnoise from across the roof.
- Leak in the rear corner between the seal and the roof panel.
- Leak between the side rail weatherstrip retainer and the roof weatherstrip
retainer.
Here are the GM parts that may be needed, depending on diagnostic results.
Part
Number |
Description |
15257741 |
Seal,
Roof FRT LH |
15257742 |
Seal,
Roof FRT RH |
15257745 |
Seal,
Roof RR PNL LH |
15257746 |
Seal,
Roof RR PNL RH |
The
following can be purchased from Kent Products by calling 1.800.654.6333.
Part
Number |
Description |
P40320 |
Kent
Automotive
3/8 x 50 inch
Close Tolerance Foam |
-
Thanks to Dan Oden |
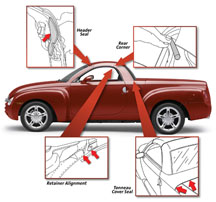
figure 5 |
| return
to Table of Contents |
|
| Memory
Seat Module |
Owners of some 2000-05 Cadillac
DeVilles may comment that the driver's seat will not return to its memory
seat position when the RKE fob is used on an intermittent basis.
The condition will occur only after the vehicle has sat for more than
10 minutes on units equipped with memory seats AND massaging lumbar
(RPO A45 or WA7). Typically, the seat will return if the memory recall
button located on the driver's door trim panel is used.
This condition has been identified as an inadvertent signal being sent
by the seat massaging lumbar module to the seat memory module during
RKE command. To correct this concern, rewire the massaging seat lumbar
circuit. Refer to PIC 3554 for further details. A service bulletin is
in development.
-
Thanks to Bill Denton |
|
| return
to Table of Contents |
|
Keyless
Entry Key Fob Verification |
You
can use the information in SI document 1460262 to verify the keyless
entry system key fob (passive).
System Operation Overview
It is not necessary to press a button on the passive fob to unlock the
door. The fob simply has to be within one meter of an antenna in the
vehicle.
In normal operation, when a door or compartment handle is operated,
the remote control door lock receiver (RCDLR) in the vehicle transmits
a “challenge” to the key fob.
If the challenge is met, the key fob will respond to the RCDLR, allowing
the door to be unlocked and opened.
Using the Tester
Place the key fob on the J 43241 test pad. Then approach the vehicle
and attempt to open each door and rear compartment. The tester should
beep during each entry attempt.
The beep indicates that the fob in question is the correct one for the
vehicle being tested, and that the fob and vehicle are capable of communicating
with each other.
-
Thanks to Art Spong |
|
|
|
return
to Table of Contents |
|
| Caster
Measurement |
This information applies to 2006 full-size C/K pickups and utilities
and Hummer H2.
In the past, the caster specification on these vehicles was measured
relative to the frame. So, when measuring the caster, you had
to take an angle reading from the frame ahead of the rear wheels and
add to or subtract from the caster readout on the alignment equipment.
This was referred to as “corrected caster.” If this was
not done correctly, caster could be over- or under-adjusted.
Beginning with model year 2006, the published specification for caster
for C/K and H2 trucks is relative to the ground. This means you can
use the alignment equipment readout for caster directly, without compensation.
TIP: No changes
have been made to the vehicle. The only difference is the way the caster
specification is expressed.
TIP: This change
does not apply to the Express and Savana vans, which continue to use
“corrected caster” specifications.
-
Thanks to Dan Stress |
| |
| return
to Table of Contents |
|
| Oil
Life System Reset Procedures -- Cars |
Many
GM cars and trucks are equipped with an oil life system that determines
when an oil change is required (fig. 6).
After the oil has been changed, it’s necessary to reset the system.
Procedures for resetting 2001 through 2006 passenger cars are published
here.
TIP: You can
find copies of charts for earlier models on the TechLink website on
the Internet. Look for the February and March 2000 issues.
The information for this article is the same as you will find in the
applicable owner or service manual. To find this information in 2001-04
SI service manuals:
- Select the vehicle
- Select category General Information
- Select category Maintenance and Lubrication
- Select category Maintenance and then GM Oil Life System-Resetting.
Beginning with 2005, this information will be found only in owner manuals.
To find this information in SI owner manuals:
- Select the vehicle
- Select Owner Manual
- Select Service and Appearance Care
- Select Checking Under the Hood
- Select Description and Operation
- Select Engine Oil Life System
TIP: You may
be able to use the Search function, using the words Oil Life.
2001-04 Seville
2001-05 DeVille
2006 DTS
1. Turn the ignition to ON but with the engine off.
2. Display the Oil Life message by pressing the Info button.
3. Press and hold the Reset button until the display shows 100% Engine
Oil Life. This resets the oil life index.
2001-02 Eldorado
1. Turn the ignition to Run but with the engine off.
2. Display the OIL LIFE LEFT message by repeatedly pressing the SKIP
INFO button.
3. Press the NO INFO RESET button until the display show 100% Engine
Oil Life. This resets the oil life index.
2003-06 CTS
Base Audio System
1. Press the up or down arrow on the INFO button located to the right
of the DIC display to access the DIC menu.
2. Once XXX% ENGINE OIL LIFE menu item is highlighted, press and hold
the CLR button.
3. The percentage will return to 100, and the oil life indicator will
be reset.
4. Repeat the steps if the percentage does not return to 100.
Navigation System
1. Turn the system on by pressing the PWR/VOL knob once. The PWR/VOL
knob is located to the lower left of the DIC display.
2. Press the INFO button located to the left of the display to access
the Vehicle Info menu.
3. Turn the TUNE/SEL knob located to the lower right of the display
until Engine Oil Life is highlighted. Press the knob once to select
it.
4. Once XXX% Engine Oil Life is displayed, press the multi-function
button next to the Reset prompt in the upper right corner of the display.
5. The percentage will return to 100, and the oil life indicator will
be reset.
6. Repeat the steps if the percentage does not return to 100.
2004-06 SRX
Base Audio System
Press the CLR button on the right of the DIC display to acknowledge
the Change Engine Oil message. This will clear the message from the
display and reset it. To reset the oil life indicator, use the following
steps.
1. Press the up or down arrow on the INFO button located to the right
of the DIC display to access the DIC menu.
2. Once XXX% ENGINE OIL LIFE menu item is highlighted, press and hold
the CLR button. The percentage will return to 100, and the oil life
indicator will be reset.
3. Turn the key to OFF.
If the Change Engine Oil message comes back when you start the vehicle,
or the percentage does not return to 100, the engine oil life system
has not reset. Repeat the procedure.
Navigation System
Press the display button to acknowledge the Change Engine Oil message.
This will clear the message from the display and reset it. To reset
the oil life indicator, use the following steps.
1. Turn the ignition to ON with the engine running.
2. Turn the system on by pressing the PWR/VOL knob located to the lower
left of the DIC display
3. Press and hold the vehicle information display button located in
the upper right of the screen for 3 seconds to enter the vehicle information
menu.
4. Use the scroll up or down display keys to select Engine Oil Life.
5. Press and hold the RESET button on the display. The percentage will
return to 100, and the oil life indicator will be reset. Repeat the
steps if the percentage does not return to 100.
6. Press the RETURN button on the display to return to the main page.
7. Turn the key OFF.
If the Change Engine Oil message comes back when you start the vehicle,
the engine oil life system has not reset. Repeat the procedure.
2004-06 XLR
2005-06 STS
1. Press the up or down arrow to scroll the DIC to show OIL LIFE.
2. Once the XXX% ENGINE OIL LIFE menu item is highlighted, press and
hold the RESET button until the percentage shows 100%. Repeat the steps
if the percentage does not return to 100.
3. Turn the key to OFF.
If the Change Oil Now message comes back when you start the vehicle,
the engine oil life system has not reset. Repeat the procedure.
2001-05 Impala
2002-05 Monte Carlo
Using the Radio
1. Turn the ignition to ACC or ON, with the radio off.
2. Press and hold the TUNE DISP button on the radio for at least 5 seconds
until SETTINGS is displayed.
3. Press the SEEK PTYPE up or down arrow to scroll through the main
menu.
4. Scroll until OIL LIFE appears on the display.
5. Press the 1 PREV or 2 NEXT button to enter the submenu. RESET will
be displayed.
6. Press the TUNE DISP button to reset. A chime will be heard to verify
the new setting and DONE will be displayed for one second.
7. Once the message has been reset, scroll until EXIT appears on the
display.
8. Press the TUNE DISP button to exit programming. A chime will be heard
to verify the exit.
Using the Accelerator Pedal
1. Turn the ignition to ON, with the engine off.
2. Fully press and release the accelerator pedal 3 times within 5 seconds.
3. If the CHANGE ENGINE OIL message flashes, the system is reset. However,
if it stays on, it did not reset. You’ll need to repeat the procedure.
2006 Impala
2006 Monte Carlo
1. Turn the ignition to ON, with the engine off.
2. Fully press and release the accelerator pedal 3 times within 5 seconds.
3. If the CHANGE ENGINE OIL message flashes, the system is reset. However,
if it stays on, it did not reset. You’ll need to repeat the procedure.
2001-02 Intrigue
2001-03 Grand Prix w/o Trip Computer
2001-04 Century and Regal w/o DIC
2005 Century
1. Turn the ignition to RUN, with the engine off.
2. Fully press and release the accelerator pedal slowly 3 times within
5 seconds.
3. If the CHANGE OIL SOON light flashes, the system is resetting.
4. Turn the key to OFF after the light has finished flashing, and then
start the vehicle.
5. If the CHANGE OIL SOON light comes back on, the engine oil life system
did not reset. Repeat the procedure.
2001-04 Regal with DIC
1. Turn the ignition to RUN, with the engine off.
2. Fully press and release the accelerator pedal slowly 3 times within
5 seconds.
3. If the CHANGE OIL SOON light flashes, the system is resetting.
4. Turn the key to OFF after the light has finished flashing, and then
start the vehicle.
5. To reset the DIC put the oil life display on the DIC.
6. Press the DIC RESET button for five seconds.
7. If the CHANGE OIL SOON light comes back on, the engine oil life system
did not reset. Repeat the procedure.
2001-03 Grand Prix with Trip Computer
1. Press the MODE button until the light appears lit next to OIL LIFE.
2. Press and hold the RESET button for three seconds. The oil life percentage
should change to 100%.
2004-06 Grand Prix
2005-06 Allure and LaCrosse with DIC
1. Press the options button on the DIC until ENGINE OIL MONITOR appears
on the DIC screen.
2. Press the set/reset button to reset the system.
The next screen indicates that the engine oil monitor has been reset.
If the vehicle is equipped with the trip computer DIC, when the gage
button is pressed and the OIL LIFE REMAINING mode appears, it should
read 100 % OIL LIFE REMAINING.
3. Turn the key OFF. If the Change Oil Soon message comes back when
you start the vehicle, the engine oil life system has not reset. Repeat
the procedure.
2005-06 Allure and LaCrosse w/o DIC
1. Turn the ignition to RUN, with the engine off.
2. Fully press and release the accelerator pedal slowly 3 times within
5 seconds.
3. Turn the ignition to OFF then start the engine.
5. If the light or message comes back on, the engine oil life system
did not reset. Repeat the procedure.
2004-06 GTO
1. Turn the ignition to RUN, with the engine off.
2. Fully press and release the accelerator pedal slowly 2 times within
5 seconds.
3. Turn the ignition to LOCK.
4. Start the engine.
5. If the CHANGE OIL light comes back on, the engine oil life system
did not reset. Repeat the procedure.
2001-03 Aurora
1. With the ignition on, press the SELECT right arrow button on the
DIC to OIL so the OIL LIFE percentage is displayed.
2. Press RESET and hold for five seconds. OIL LIFE XXX% will appear
and then when the button is released OIL LIFE 100% will be displayed.
2001-05 Bonneville
1. Display OIL LIFE on the DIC.
2. Press and hold the RESET button for more than five seconds. The oil
life will change to 100%.
2001-05 LeSabre
2001-05 Park Avenue
1. Display OIL LIFE INDEX on the DIC.
2. Press and hold the RESET button on the DIC for more than five seconds.
The oil life will change to 100%.
2006 Lucerne
1. Display OIL LIFE REMAINING on the DIC.
2. Press and hold the SET/RESET button on the DIC for more than five
seconds. The oil life will change to 100%.
2001-06 Corvette
1. Turn the ignition to ON, with the engine off.
2. Press the TRIP button so the OIL LIFE percentage is displayed.
3. Press RESET and hold for two seconds. OIL LIFE REMAIN 100% will appear.
2001-02 Camaro
2001-02 Firebird
1. Turn the ignition to RUN but with the engine off.
2. Push the Trip/Oil Reset button located on the instrument panel for
12 seconds. The Oil Change light will start to flash to confirm that
the system is reset. The reset is completed when the Oil Change light
goes out.
2001-03 Grand Am
2001-03 Alero
1. Turn the ignition to ON.
2. Push the RESET button located in the driver’s side instrument
panel fuse block. The CHANGE OIL light will start to flash.
3. Press and hold the RESET button again. The reset is complete when
you hear the chimes sound and the CHANGE OIL light goes out.
2004-05 Grand Am
2004 Alero
1. Turn the ignition to RUN, with the engine off.
2. Fully press and release the accelerator pedal slowly 3 times within
5 seconds.
3. The reset is complete when you hear the chimes and the Change Oil
light goes out. If the light stays on and no chime is heard repeat the
reset procedure.
4. Turn the key to OFF.
5. Start the engine. If the CHANGE OIL SOON light comes back on, the
engine oil life system did not reset. Repeat the procedure.
2005-06 Cobalt
2005-06 Pursuit
2006 Solstice
1. Turn the ignition to RUN, with the engine off.
2. Press the information and reset buttons on the DIC at the same time
to enter the personalization menu.
3. Press the information button to scroll through the available personalization
menu modes until the DIC display shows OIL LIFE RESET.
4. Press and hold the reset button until the DIC shows ACKNOWLEDGED.
This will tell you the system has been reset display message will appear
for 3 seconds or until the next button is pressed.
5. Turn the key to LOCK.
6. Start the engine. If the CHANGE OIL SOON message comes back on, the
engine oil life system did not reset. Repeat the procedure.
2005-06 G6
1. With the CHANGE OIL SOON message displayed, press any of the three
DIC buttons to clear the CHANGE OIL SOON message.
2. Display OIL LIFE RESET on the DIC.
3. Press and hold the ENTER button for at least one second. An ACKNOWLEDGED
message will appear for three seconds or until the next button is pressed.
This tells you the system has been reset
4. Turn the key to OFF.
5. Start the engine. If the CHANGE OIL SOON message comes back on, the
engine oil life system did not reset. Repeat the procedure.
2004-06 Malibu
1. Display OIL LIFE RESET on the DIC.
2. Press and hold the ENTER button for at least one second. An ACKNOWLEDGED
display message will appear for 3 seconds or until the next button is
pressed. This will tell you the system has been reset.
3. Turn the key OFF.
If the Change Oil Soon message comes back when you start the vehicle,
the engine oil life system has not reset. Repeat the procedure.
2002-05 Saturn L
1. Turn the ignition to RUN, with the engine off.
2. Fully press and release the accelerator pedal 3 times within 5 seconds.
3. If the CHANGE OIL SOON light is flashing, the system is reset. The
light will flash for up to 30 seconds or until the ignition is turned
off.
4. If the light comes on again and stays on for 30 seconds at the next
ignition cycle, it did not reset. Reset the system again.
2003-06 Saturn Ion
1. Press and release the trip/reset button until the OIL LIFE message
is displayed.
2. Press and hold the trip/reset button until a chime sounds 5 times
and RESET is displayed in the message center. When the system is reset,
the odometer will again be displayed in the message center.
3. Turn the key OFF. If the CHG OIL message comes back on when you start
the vehicle, the system has not reset. Repeat the procedure.
-
Thanks to Jerry Garfield |

figure 6 |
| return
to Table of Contents |
|
| Wiring
Harness Repair Issues |
When
a replacement harness is ordered from GMSPO, a determination is made
by the Product Quality Center (PQC) whether it is a Body or I/P Harness.
If the harness is on order restriction, the dealer will be directed
to repair the harness if possible, instead of replacing it. Most damage
to a harness can be repaired, often quicker than a replacement harness
can be shipped.
This is particularly true if the harness is for a vehicle no longer
under warranty. GMSPO now stocks few harnesses for these vehicles, and
likely will carry even fewer in the future. In these cases, a replacement
harness must be hand-built, which results in a very long wait time.
TIP: Some vehicles
are outside this harness restriction. These include the International
Joint Venture Platforms (IJVP) e.g., Pontiac Vibe, Tracker, etc., and
the MD Trucks (GMT 560).
For vehicles still in production, the harness may be available through
the Ship Direct Process.
Ship Direct Process
GM has several wiring harness suppliers. To qualify for the Ship Direct
Process, the supplier must agree to stock every harness that is in current
production, and must be prepared to send the harness directly to a dealer
if one is ordered.
If PQC determines that a new harness is necessary, and if the wiring
supplier of the needed harness participates in the Ship Direct Process,
a new harness is shipped the next day.
Once there is a change to a production harness such that the new part
cannot service the previous part number, then GMSPO stocks the previous
part and the new number becomes the new Ship Direct part. This will
continue until the vehicle is no longer in production.
Availability of Repair Parts
It is always best to repair a harness rather than replace a harness.
GMSPO offers everything needed to make a wiring repair -- including
tape, wire, clips, clamps and conduit.
Connector assemblies can be purchased several ways. Some connectors
consist of only the connector body. In other cases, several loose parts
are needed to make up a complete connector (TPA, CPA, empty cavity plugs,
wire cover, etc.). If so, the connector will come as a Connector Kit,
available from GMSPO. Simply order the connector in question and you
will get the necessary part(s).
TIP: There are
also pigtails available for any connection system with eight cavities
or less.
Every GM dealer has a J-38125 Terminal Repair Kit which will soon be
updated with four new trays of terminals. If this kit is kept properly
maintained and organized, it will provide replacements for nearly any
terminal now in use in GM vehicles. In fact, the kit has replacement
terminals and repair tools for every GM platform from 1956 to the present.
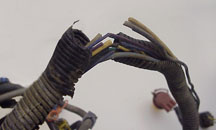
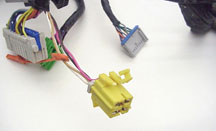
Repairable Examples
(Fig. 7) shows a damaged connector and
terminals that can be replaced.
(Fig. 8) shows cut wires that can be spliced.
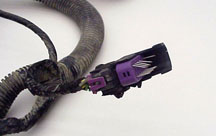
(Fig. 9) shows a damaged SIR connector
that can be replaced with a pigtail.
Other Issues
If the vehicle in question is in a body shop for collision repairs rather
than warranty repairs, the harness is still going to be a restricted
sale. So, repairing the harness rather than replacing it may be the
most appropriate action. This should be addressed on a case by case
basis.
If an independent repair shop wishes to order a harness, they should
understand this harness availability situation. They can repair the
harness in the same manner that a dealer can; the parts are available.
For older vehicles, they must be prepared to wait for a replacement
harness.
-
Thanks to John Roberts |
figure
7 |
figure
8 |
figure
9 |
| return
to Table of Contents |
|
| New
Model Features on the Web |
GM STC is enhancing the training program with an effective new Web tool
(US only). To better serve the GM technician audience and to ensure
new model technical information is available just-in-time, starting
March 2005 the majority of New Model Features (NMF) information is being
delivered on the GM Training Website.
In the past, New Model Feature IDL seminars were used to deliver this
information, either covering a whole division or focusing on a few vehicles.
While IDL seminars and Service Know-How videos may still be used occasionally
to introduce a new vehicle, the majority of vehicles will be showcased
in their own web based module.
This new delivery method allows the technicians to review modules on
specific vehicles highlighting those items that are new or updated for
the model year. The information is available on-demand any time, day
or night, reducing time away from the service bay. The enhancement further
satisfies service technicians’ need for on-demand knowledge resources.
With the NMF Web tool, training information will consist of media files
that are easily accessible from the GM Training Website. From the Menu,
click Service Know-How/TECHAssist.
The training modules are created for individual vehicles using text,
2D & 3D animation, photos and video. The NMF modules will coincide
with new vehicle release dates throughout the year.
Modules are not directly associated with any GM STC certification. However,
credit is applied to the technician training record upon successful
completion of the module. NMF modules are intended to be informational
in nature, providing timely data to help improve performance on the
job.
How to Access NMF Modules
An easy-to-use interface is available for users to find the new model
content they need. To begin, do the following:
1. Log on to the GM Training Website (www.gmtraining.com).
2. From the Menu, click Service Know-How/TECHAssist.
3. Under the table of contents, select New Model Features.
4. Select the division of the vehicle you wish to view
5. Click the vehicle you wish to view. This will open the catalog page.
6. Click Launch Course
If you have any questions, please contact the GM Training Help Desk
at 888.748.2687, or visit the GM Training Website (www.gmtraining.com).
- Thanks to Susan Fritschi |
| |
|
return
to Table of Contents |
|
| Front
Drive Axle Lubricant |
This lubrication information applies to 1999-2005
light duty trucks with 4-wheel or all-wheel drive and with separate
front drive axle carriers.
IMPORTANT: Front
drive axle carriers do not require periodic lubricant replacement.
-
Thanks to Jerry Garfield
Axle
Size |
Years |
SAE
80W-90 Axle Lubricant.
p/n 1052271 or 89021671 (U.S.)
p/n 10950849 or
89021672 (Canada) |
SAE
75W-90 Synthetic Axle Lubricant meeting GM Specification 9986115
p/n 12378261 or 89021667 (U.S.) p/n 10953455 or 89021678 (Canada |
7.25
inch |
1999-2001 |
Use |
Can
use but not required |
7.25
inch |
2002-2005 |
-- |
Use |
8.25
inch
with selectable 4WD |
1999
- 2005 |
Use |
Can
use but not required |
8.25
inch
with AWD |
1999
- 2005 |
-- |
Use |
9.25
inch |
1999-2001 |
Use |
Can
use but not required |
9.25
inch |
2002-2005 |
-- |
Use |
|
| |
|
return
to Table of Contents |
|
| Tie
Rod Specifications Revised |
Bulletin
05-02-32-003 is being issued to revise the outer tie rod end nut tightening
specification and to include the tie rod end jam nut tightening specification
in the Power Steering sub-section of the Service Manual for model years
1998-2005. It affects Buick Regal and Century, Chevrolet Monte Carlo
and Impala, Oldsmobile Intrigue and Pontiac Grand Prix.
-
Thanks to Pete Kalaj
Application |
Specification |
Metric |
English |
Outer
Tie Rod End Nut* |
30
Nm + 120° |
22
lb ft + 120° |
Tie
Rod End Jam Nut |
70
Nm |
52
lb ft |
*Visually inspect to ensure that 2 1/2 to 4 1/2 threads are visible past
the nylon washer. |
| |
|
return
to Table of Contents |
|
| Headlamps
On in Daytime |
Owners of some 2005 Cadillac STSs may comment
that the low beam headlamps (not DRLs) are on during daylight conditions.
Inspect the windshield wiper switch position. If the windshield wiper
switch is in any ON position, the IPM will command on the headlamps.
This is a normal condition.
TIP: Vehicles
equipped with Rainsense windshield wipers may have the wiper switch
on with no activation of the wipers.
-
Thanks to David Wells |
| |
| return
to Table of Contents |
|
| Battery
Draw |
When
parking a 2004-05 Chevrolet Colorado or GMC Canyon Pick Up with the
key left in the ignition, a battery draw may occur. This will be noticed
only when the door is not completely closed to the primary latch position.
If the door is closed only to the secondary latched position, the chime
will sound continuously and the radio will not time out, resulting in
a battery draw or dead battery. This is a normal operating characteristic.
When leaving the key in the ignition, it is important to be sure that
all doors are closed completely to the primary latch position. Making
the customer aware of this concern will lead to a resolution.
-
Thanks to Dino Poulos |
|
|
| return
to Table of Contents |
|
| Intermittent
Dome Lamp Operation |
On some Hummer H3s, the warning chime may sound intermittently, the
dome lamp may come on and/or the door locks may cycle. This typically
occurs when going over bumps or accelerating. The cause may be the adjustment
of the swing gate closing switch (fig. 10).
Using the Tech 2, monitor the BCM input data for the "Passenger
Door Ajar Sw.".
TIP: This input
is for all of the passenger doors. It may be necessary to disconnect
the swing gate ajar switch to verify it is the source of the concern.
If the concern is isolated to the swing gate ajar switch, apply a sticky
backed rubber or plastic patch approximately 3 mm thick to the swing
gate inner panel where the switch contacts the door.
-
Thanks to Ron Erman |
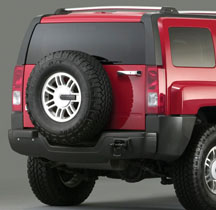
figure 10 |
| return
to Table of Contents |
|
| Interior
Turning Pink |
Owners
of some 2004-06 Cadillac XLRs (fig. 11)
may comment that the interior of the vehicle is turning pink. The concern
may be seen on door panels, the driver’s knee bolster and passenger’s
glove box. The concern is mostly apparent on vehicles equipped with
the Shale interior (RPO 15I). The condition is linked to vehicles that
are stored in the winter months in a warehouse that uses propane fork
lift (hi-lo) vehicles. The dye of the interior reacts to high concentrations
of combustion by-products and turns to a pink tint.
Most of the pink discoloration can be removed by using a 50-50 mixture
of isopropyl alcohol and water. Exposure to natural sunlight for 2-3
hours will completely remove the pink coloration.
-
Thanks to Paul Radzwilowicz |
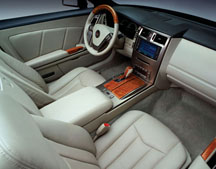
figure 11 |
|
return
to Table of Contents |
|
 Car Issues
— Fix It Right the First Time (new issues in bold) Car Issues
— Fix It Right the First Time (new issues in bold) |
Model
Year(s) |
Vehicle
Line(s) /
Condition |
Do
This |
Don’t
Do This |
Reference
Information / Bulletin |
2004-2005 |
Grand
Prix, LaCrosse – Blower Motor Inoperative or Intermittent,
Blower Speed May Drop or Blower Continues to Run After Key Off |
Install
330MFD capacitor between LPM circuit and ground. |
Don’t
replace LPM, blower motor or HVAC control head. |
05-01-39-001A |
2002-
2005 |
Buick
LeSabre – Front Door Window Binds/Inoperative/Moves Slowly |
Adjust glass. |
Don’t replace window regulator. |
05-08-64-011 |
2002-2007 |
Cavalier,
Sunfire, Grand Am, Classic – Vehicle Hesitates, No Start,
Lack of Power, Low Fuel Pressure |
Replace
fuel pump strainer. |
Don’t
replace fuel pump module. |
05-06-04-026A |
2001-2003 |
Aztek,
Rendezvous – Window Regulators Separate from Window Motors |
Use window regulator clips and procedure in 05-08-64-008 instead
of replacing complete window regulator assemblies. |
Don’t
replace window regulator assemblies that are serviceable and only
have broken clips. |
03-08-64-015 |
1999-2004 |
All
Cars and Trucks – Brake Warranty, Service and Procedures |
Issue
One: Refinish brake rotor.
Issue Two: Measure for LRO |
Issue
One: Don’t replace the brake rotors.
Issue Two: Don’t measure for LRO |
00-05-22-002D |
2002-2005 |
Cars
and Trucks – Multiple Driveability Symptoms/Clogged Fuel
Injectors |
Clean
fuel injectors as described in Bulletin. |
Don’t
replace fuel injectors. |
03-06-04-030A |
|
| return
to Table of Contents |
|
|
 Truck
Issues — Fix It Right the First Time
(new issues in bold) Truck
Issues — Fix It Right the First Time
(new issues in bold)
|
Model
Year(s) |
Vehicle
Line(s) --
Condition |
Do
This |
Don’t
Do This |
Reference
Information / Bulletin |
2005 |
SSR, Colorado/Canyon, TrailBlazer, Envoy, Rainier – CD Issues |
Load
new radio software calibration. |
Don’t
replace or exchange radio. |
04-08-44-021A |
2003-2005 |
Full Size Pickup and Utilities, H2 – Rear Seat Audio and/or
Rear HVAC Controls Inoperative |
Replace
RSA. |
Don’t
replace console. |
03-08-44-018A |
2001-2005 |
Chevrolet/GMC 36 Series Cab/Chassis – DTC P1172 or P2636,
Fuel Gauge Reads Empty, SES Light On |
Modify
fuel tank balance line. |
Don’t
replace fuel tank unit, PCM or fuel transfer pump. |
05-06-04-008 |
2002-2005 |
Escalade,
Yukon – Stains on Rear Bumper Step Pad |
Apply
Armor-Dillo to rear step pad. |
Don’t
replace rear step pad. |
03-08-43-002A |
2000-2003 |
Tahoe, Suburban, Yukon, Yukon XL – DTC P0446 Set, SES Illuminated |
Replace
EVAP vent solenoid. |
Don’t
replace EVAP canister. |
04-06-04-055 |
2004-2005 |
Midsize
and Fullsize Pickups and Utilities – CD Issues |
Load new software calibration. |
Don’t
exchange or replace radio. |
|
| 2002-2005 |
Tahoe,
Suburban, Yukon, Escalade, Avalanche, H2 – Exhaust Pop/Ping
Noise |
Replace
heat shield. |
Don’t
replace exhaust system. |
03-06-05-008B |
| 2004-2005 |
All
Cars and Trucks – State-of-Charge Upon Delivery of New Vehicle |
Check
battery’s state-of-charge per revised PDI procedure using
J-42000 or J-42000-EU. |
Don’t
remove and replace battery. |
02-06-03-009A |
| 2002-2004 |
Silverado,
Suburban, Tahoe, Sierra, Yukon/XL, Escalade EXT – Rough
Idle, Misfire, MIL DTC P0300 |
Measure
intake manifold for warpage across two runner ports only. Replace
upper manifold gasket with teal-green gasket. |
Don’t measure intake manifold for warpage across all four
intake runner ports. Don’t replace upper intake manifold
gasket with orange-colored gaskets. |
05-06-04-029 |
2001-2003 |
Fullsize
Pickups – Injector Replacement for High Flow Rates |
Use
Corporate Bulletin Number 04-06-04-007A for injectors with high
fuel return rates. Use Special Policy 04039 for all 01-02 vehicles. |
Don’t
replace 8 injectors for any complaint other than high fuel return
rates. All other injector failures are fix as failed. |
Special Policy 04039 |
|
| return
to Table of Contents |
|
|
| Know-How
Broadcasts for October |
| |
 |
| Know-How
Broadcasts for October |
| 10290.10D
Emerging Issues |
October
6, 2005, 9:30 AM and 12:30 PM Eastern Time |
| New
Model Features |
For
Web NMF courses, log on to the GM Training Website (www.gmtraining.com).
Select Service Know-How from the menu, then choose New Model
Features for a selection of courses. |
| -
Thanks to Tracy Rozman |
|
|
| return
to Table of Contents |
|
