
| Note: Click a picture or illustration in the left column to view a large version in the article. To hide the large version, simply click on it. |


|
||
TIS 2 Web Update |
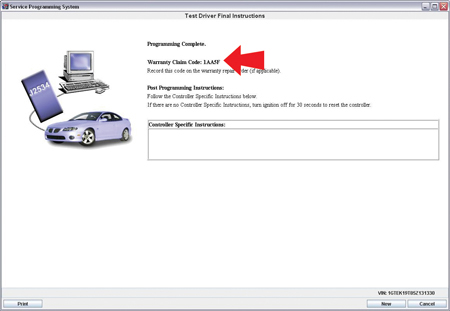
TIS 2 Web Launches SPS GM Service and Parts Operations (GMSPO) has recently launched the next phase of the TIS 2 Web. Service Programming Systems (SPS) has now been added to the suite of TIS 2 Web applications along with Tech 2 software download. As part of an initiative to make all service applications available over the Internet and optimize your dealership’s MPI hardware, TIS 2 Web is providing technicians access to the latest vehicle updates possible. The Benefits of SPS over the Internet Having SPS available on TIS 2 Web allows GM the ability to quickly release updates for all vehicle lines, which means technicians will have access to the latest calibrations available. This improved update process helps technicians to work more efficiently and 'Fix It Right The First Time'. How to Get Ready The Techline PC must have Internet access and meet the minimum hardware and network specifications to function properly when using TIS 2 Web or any service application. These specifications can be found at http://service.gm.com/techlineinfo/techlinepc.html. Also, technicians must have their own individual DealerWorld ID and Password to log on to GM DealerWorld http://www.gmdealerworld.com. The dealership's Partner Security Coordinator can create the IDs and provide the appropriate credentials to access TIS 2 Web under the Service tab in GM DealerWorld. Upon accessing SPS from TIS 2 Web, technicians will find that updates have been made to improve the usability of SPS while keeping its familiar functionality. TIP: In Canada, TIS 2 Web is accessed from the GMinfoNET. Technicians must have their own Autopartners ID and Password to log on to the GMInfoNET. TIP: In Mexico, TIS 2 Web is accessed from E-Dealers. Using TIS 2 Web For All SPS Events Dealers should begin using TIS 2 Web immediately for all service programming events and Tech 2 software downloads. As the remaining applications within TIS such as Tech 2 View and Snap Shot are added to TIS 2 Web, TIS 2 Web will become the primary service diagnostic and reprogramming resource made available to technicians. Future communications will inform you regarding updates to TIS 2 Web. When a programming event is completed, a screen will appear containing a warranty claim code (fig. 3). This code must be added to the Failure Code/OBDII field on the warranty claim for all SPS events. Refer to bulletin 06-08-47-001 for details. If there are any questions, please contact the Techline Customer Support Center (TCSC) at 1.888.337.1010 (prompt 3) in the US. In Canada, 1.800.828.6860 English or 1.800.503.3222 French. - Thanks to Mike Waszczenko and Devin Koski |
|
|
||
Tech 2 Navigation Changes figure 4 |
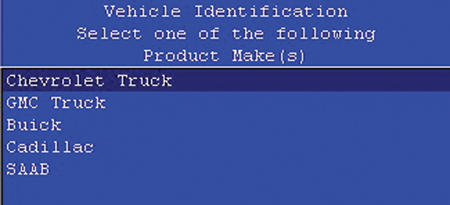
For CD version 26.005, under the TECH 2 path “Diagnostics > (7) 2007 > LD Trk, MPV, Incomplete,” the VIN character designations have been removed (fig.4).
The NAO CD is used all over the world and includes vehicles not sold in North America. Some of these vehicles do not use the same VIN designation as North America. This change was made because some new vehicles have been added that would have conflicted with the existing navigation. The VIN designations are obsolete and would have caused confusing menus. - Thanks to Brian Buck |
|
|
||
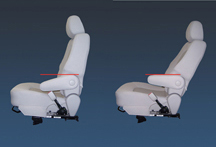
| On the Chevrolet HHR, the armrest attached to the seatback has two positions, up and down. In the down position, the angle of the arrmrest depends on how much or how little the seatback is tilted (fig. 5). There is no independent adjustment for the armrest position.
This is normal operation and no repair should be attempted. TIP: The armrest is guided by a pin-in-slot arrangement. If the pin comes out of the slot due to overloading, the pin can be returned to the slot and the armrest becomes fully functional again. - Thanks to Dana Rush |
||

|
||
| Navigation Disc Update Program |
To improve customer satisfaction with the factory installed DVD Navigation System, GM is announcing a new Navigation Disc Update Program and a new GM Navigation Disc Center, which launches on March 15, 2006. |
|
|
|||||||||||
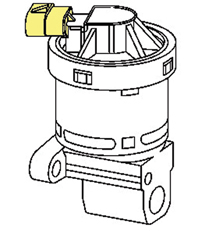
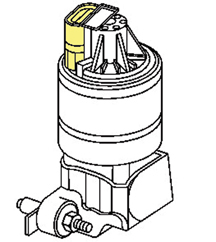
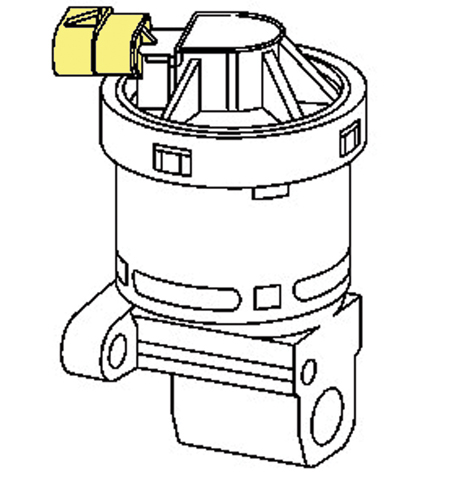
| Bulletin 06-06-04-002 has been released to deal with an EGR condition involving the SES light. It may be accompanied by DTC P1404 and/or DTC P0404 which may have led to previous EGR valve and PCM replacements. The bulletin applies to 2005-06 Chevrolet Malibu built prior to August 1, 2005 and Pontiac G6 built prior to September 1, 2005 with 3.5L V6 Engine (VIN 8 – RPO LX9). The EGR valve kit, p/n 89018175, is used to convert an LX9 engine used in the Chevrolet Malibu and Pontiac G6 equipped with a Delphi EGR valve to a Siemens valve. The kit contains all necessary parts for conversion.
The powertrain control module (PCM) calibration must be updated for the Siemens EGR valve to work correctly. Failure to install an updated calibration when using this conversion kit may cause PCM diagnostic codes to set, resulting in a Service Engine Soon indicator lamp to illuminate. If a Siemens valve is already installed, it is not necessary to install this kit. Individual components are serviced. Instructions Refer to bulletin 06-06-04-002 for complete installation and programming instructions. - Thanks to Jim Kelly and Duane Raymond |
|||||||||||

|
||
| Remote Unlock Inoperative |
Some owners may comment that the door of their 2003-06 Chevrolet SSR will not unlock with the key remote. This may happen after the vehicle is washed and parked in freezing temperatures. The front side door actuator (bell crank) bracket assembly may freeze where it rotates. If this is the condition, replace both front side door actuator bracket assemblies (p/n 15865377). - Thanks to Dan Oden |
|
|
||
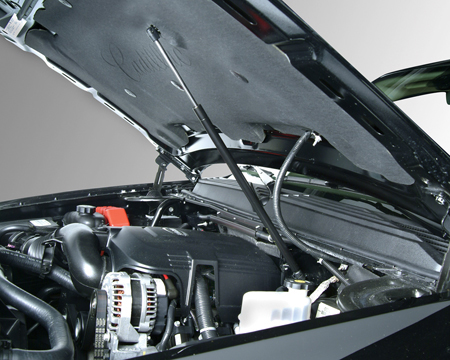
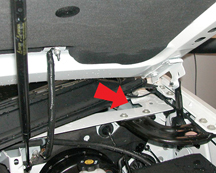
| This information applies to the 2007 full-size utilities, which use a center-mounted support strut (gas spring) for the hood (fig. 8).
Before closing the hood, be sure all the filler caps are properly installed. Then bring the hood from full open to within 6 inches (150 mm) of the closed position, pause, then push the front center of the hood with a swift, firm motion to fully close the hood. - Thanks to Dave Roland |
||

|
||
|
|
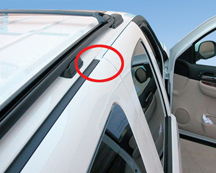
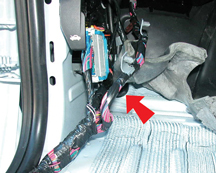
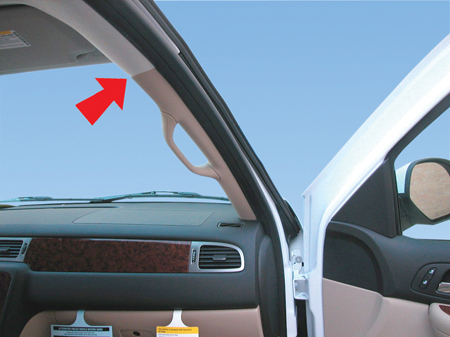
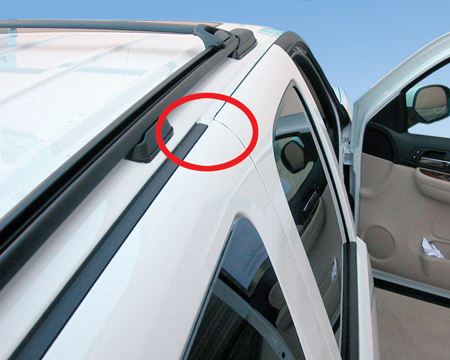
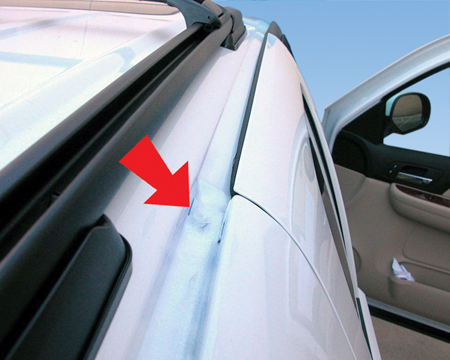
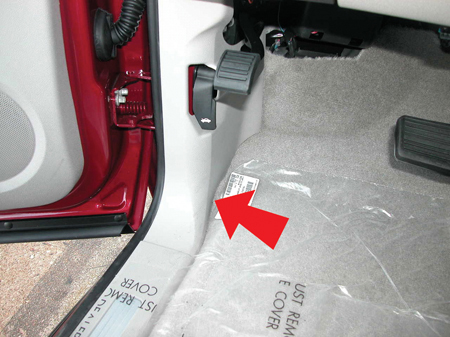
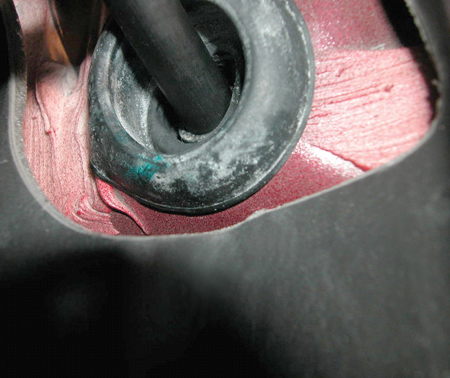
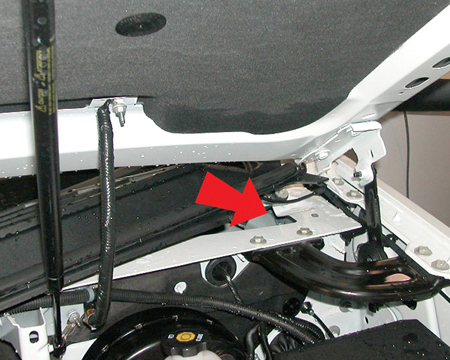
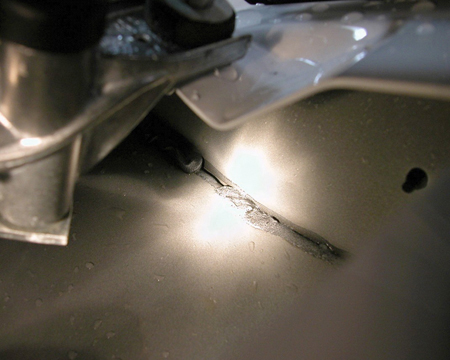
A bulletin is being prepared to explain how to locate and repair water leaks in the 2007
Run water over the front of the rubber roof ditch molding (fig. 10). If a leak is observed, remove the ditch molding and look for a void in the sealer between the roof ditch sealer melt strip and the sealer patch. If a void exists, fill the void with sealer (fig. 11) and retest with running water. Kickpad Carpet 1 -- moisture in kickpad area (fig. 12). Remove the kickpad and sill plate (fig. 13). Lift the carpet. Look for sealer in contact with the park brake grommet (fig. 14). Remove sealer and replace the grommet. Run water on the outside of the park brake grommet in the engine compartment. Run water onto the center of the cowl screen between the windshield wipers at the base of the windshield. If there are voids in the sealer (fig. 16), add sealer as necessary and retest with running water. - Thanks to Saundra Massingille |
|


|
||
Underhood Lamp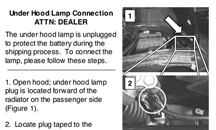 figure 17 |
Corvettes are now leaving the assembly plant with the underhood lamp disconnected to protect the battery during the shipping process. An information sheet (fig. 17) is attached to the instrument cluster as a reminder to connect the lamp during new vehicle preparation. Locate the lamp plug attached to the radiator housing and remove the yellow tape. Plug it into the wiring harness on the radiator housing. Check lamp operation. - Thanks to Art Spong |
|

|
||
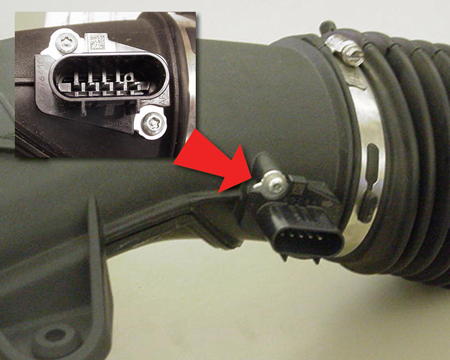
MAF Sensor Attachment figure 18 |
Some early 2006 Chevrolet Corvette Z06 air induction system MAF sensors were attached to the air induction housing with five-lobed Torx Plus tamper-resistant fasteners (fig. 18). These fasteners have a post in the center of the lobes.
If it becomes necessary to remove the MAF sensor and you don’t have the appropriate removal tool, use a thin cut-off wheel on a die grinder to create a slot in the fastener head. TIP: The air induction housing must be removed from the vehicle before grinding. Once the slot is cut, use a straight blade screwdriver to remove each fastener. GM p/n 11589093 is available as a replacement fastener. This service fastener has a T20 Torx head. - Thanks to Dave Libby |
|
|
||
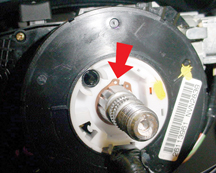
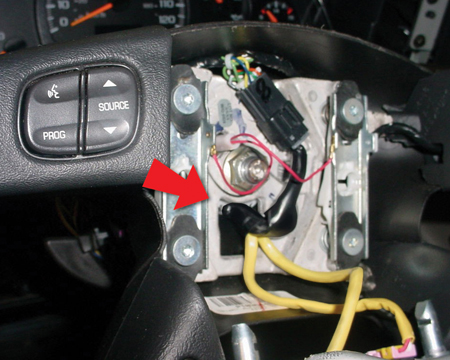
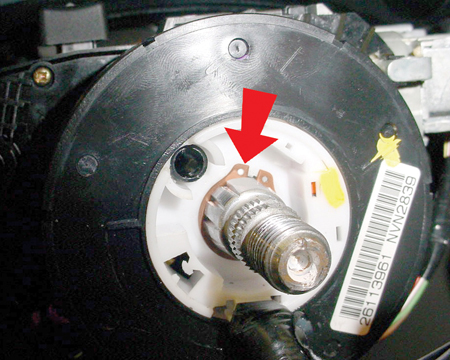
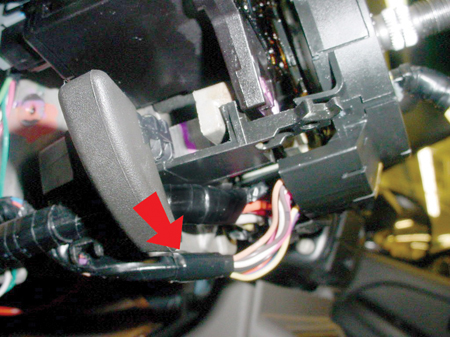
Inflatable Restraint Steering Wheel Module Coil Noise |
Owners of some 2003-06 C/Kvehicles may experience a noise (rubbing, scraping, clicking, etc.) coming from the steering column area while turning the steering wheel. TIP: The process of removing the SIR module may be enough to free up wires that have been tucked behind the steering wheel. 5. If the retaining ring is properly seated and the noise is still present, check that the coil wiring harness is properly routed along the steering column (fig. 21). Any excess force or tension on the outer housing of the coil due to improper routing could cause noise. If wiring is improperly routed, correct the concern and re-check for noise. 6. If the retaining ring and all wiring is installed correctly and noise is still present, perform the coil centering procedure (SI document 822781). Re-install the coil and re-check for noise. |
|


|
||
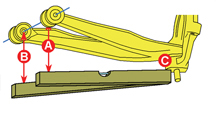
A new procedure is now available for measuring Z height on the Colorado, Canyon, Hummer H3 and 2007 full-size trucks. It should be used for these vehicles as well as future products, as indicated in the appropriate vehicle Trim Height Inspection Procedure in SI for those vehicles. Again, refer to (figure 22). Now keep the top edge of the level on the reference surface of the steering knuckle (C) and move the level directly under the front end of the rear attachment bolt of the lower control arm (B). Repeat the measurement as described earlier. |
||

|
||
Rear Main Oil Seal Leak |
This information applies to 2005 Buick Terraza, Chevrolet Uplander, Pontiac Montana SV6 and Saturn Relay. |
|
|
||
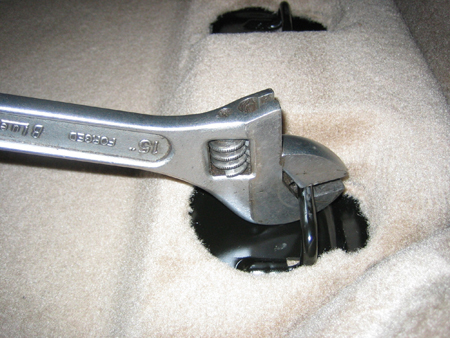
| This information applies to the 2007 Cadillac Escalade, Chevrolet Tahoe and GMC Yukon with RPO (ARS). One or both of the following conditions may affect the power fold and tumble second row seats: 1. The seat bottom will not flip forward on the second stage of the fold and tumble seat. 2. The seat back will not fold back to the upright position after the rear seat bottom is latched. The outer striker may not be fully latching into the seat bottom. To repair this condition, use an adjustable wrench (fig. 23) to rework the outer striker (closest to the door) 1-2 mm (0.04-0.08 in) forward toward the front of the vehicle. This should center the striker with the seat bottom latch. - Thanks to Paul Radzwilowicz |
||

|
||
4WD Models With Noise, Vibration on Dry Pavement |
Owners of some 1996-2007 light duty trucks and utilities equipped with four wheel drive (4WD) may comment about a groan, growl, or moan coming from the vehicle when operating the vehicle in 4WD. The vibration that is heard or felt is a result of the front axle being excited to resonance at its natural frequency. This is a combination of the transfer case chain link frequency, engine firing frequency, tire circumference variation, and various other tolerances built into the 4WD system. A groan, growl or moan noise on deceleration while in 4WD is also the result of loading the transfer case chain, which is a normal operating characteristic. This is an example of a transfer case link frequency noted above. On certain models, such as 3/4 and 1 ton vehicle, tire pressures can vary from front to rear, based on the manufacturer’s specifications. Example: the manufacturer’s specifications for tire pressures on a 2003 K2500 Suburban are front: 50 PSI, rear: 80 PSI. The difference in tire pressures affects the rolling tire circumference from front to rear, which can increase driveline noise while in 4WD. This is a normal operating characteristic. For test purposes, drop the tire pressure in the rear to match the front. If the noise is reduced or eliminated, this confirms the difference in tire pressures from front to rear can affect the noise when operated in 4WD. Set the rear tire pressure back to the manufacturer's specification. For vehicles with same tire pressures front to rear, swap tires from an identically built vehicle that does not seem to exhibit the concern and re-evaluate both vehicles. No repairs are recommended for this condition. For more information regarding driveline noises while in 4WD, refer to the latest version of bulletin 01-04-18-001D. - Thanks to Rusty Sampsel |
|
|
||
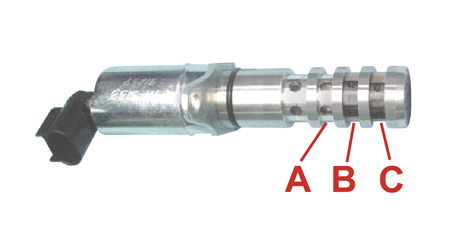
| This information applies to 2005-06 Buick Rainier, Chevrolet TrailBlazer, GMC Envoy and Saab 9-7x with 4.2L Engine (VIN S - RPO LL8). On rare occasions, a rough idle or running concern may be encountered with a P0014 and / or P0017 DTC. Due to the rough idle, a P0106 DTC may also be stored. This may be due to debris in the camshaft actuator system, which may be caused by a missing camshaft actuator solenoid screen or a worn crankshaft thrust bearing. TIP: If the condition is due to a worn crankshaft thrust bearing, some customers may also comment on a drive belt noise. Follow SI diagnostics and repair as necessary. If the SI diagnostics do not isolate the cause of this concern, ensure that the screens are in place (fig. 24). A Screen for advance pressure to camshaft actuator B Screen for pressurized oil from oil pump C Screen for retard pressure to camshaft actuator If any of the screens is missing, replace the camshaft actuator solenoid and change the engine oil and filter. If all screens are present, measure the crankshaft end play to ensure that it is within the specification of 0.0044 - 0.0153 in. (0.112 - 0.388 mm). Typically, if excessive crankshaft end play is causing this concern, it will be obviously out of specification by .050 in. (1.3 mm) or more and there will be metal in the engine oil. If crankshaft end play is obviously excessive, disassemble the engine and inspect all bearings and journals, the crankshaft, the oil pump, and all valvetrain components for obvious damage from excessive metal in the engine oil. If the engine block has been damaged due to contact with the crankshaft, contact the PQC at 1.866.654.7654 for engine replacement authorization. If there is no engine block damage, determine what it will cost to repair the engine, including time to thoroughly clean all of the oil galleys in the cylinder head and engine block. Then, determine what it will cost to replace the engine and contact PQC to review the cost analysis figures as outlined in 02-07-30-029F. If crankshaft end play is within specification, replace the camshaft actuator solenoid. - Thanks to Jamie Parkhurst |
||

|
||
Code P0171 and No Engine Performance Concerns |
This information applies to the 2004-06 Chevrolet Colorado, GMC Canyon and 2006 Hummer H3. On rare occasions, a SES light may be experienced with a P0171 and no engine performance concerns. Low MAF sensor grams and excessive long term fuel trim may be noted at a hot idle. If the SI diagnostics do not isolate a concern, the following information may help. 1. Inspect the AIR intake system for rolled connections, cracks, or loose clamps between the MAF sensor and throttle body and repair. 2. If the long term fuel trim is consistently over 10% during an extended hot idle, temporarily plug the PCV vacuum pipe at the left rear of the cam cover, reset the fuel trims and note the long term fuel trim again after an extended hot idle. If the fuel trim stays below 10%, the PCV system may be drawing in un-metered fresh air through: - the cam cover - air intake snorkel - air cleaner resonator - PCV dirty air hose rubber connector - PCV fresh air hose Inspect all of these areas for concern and repair as necessary. 3. If this concern was not present before the air cleaner resonator (on top of the cam cover) was removed during recent repairs, the PCV fresh air hose may not be fully seated to the tube on the right rear of cam cover or to the air cleaner resonator. If this concern was not present before the cam cover was removed for internal engine repairs and there is no problem found on step 2, there may be a cam cover or cam cover gasket concern. 4. If the long term fuel trim stays above 10% with the PCV vacuum pipe plugged, temporarily remove the air filter element, reset the fuel trims and evaluate the fuel trim after an extended hot idle. If the fuel trim remains around 0% with the air filter element removed, there is an issue with the air filter that is causing lower than normal MAF readings. Replace the air filter and evaluate the concern. 5. If none of the above helps, inspect the throttle body gasket. If it is mispositioned, it may cause an intermittent vacuum leak. TIP: Any of the above items can cause unmetered air to enter the engine, resulting in a lean concern and a P0171 DTC. - Thanks to Jamie Parkhurst |
|
|
||
Part Number Correction |
An incorrect part number appeared in the Axle Vent Hose Fluid Leak article (Feb. 2006, page 7). The correct part number for the filter is 5651682. | |
|
|||||||||||||||||||||||||||||||||||||||||||||||||||||||||||||||||
|
|||||||||||||||||||||||||||||||||||||||||||||||||||||||||||||||||
|

|
||||||||||||||||||||||||||||||||||||||||||||||||||
|
||||||||||||||||||||||||||||||||||||||||||||||||||
|
 Truck Issues — Fix It Right the
First Time
Truck Issues — Fix It Right the
First Time
|
|||||||||||
Know-How Broadcasts for May
|
|
||||||||||
|
|||||||||||
