|
 |
Note: Clicking
on any picture or illustration will open a larger version of that art.
|
|
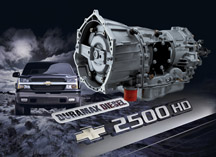
Allison
LCT 1000 Transmission |
The Allison LCT
1000 automatic transmission is offered in 3/4- and 1-ton Silverado and
Sierra trucks with the 8.1L gasoline and 6.6 Duramax diesel engines
(fig. 1). This robust transmission offers
five forward speeds and one reverse. The forward and reverse gear ratios
are accomplished by five clutches.
TIP: The Allison
is unique in having no bands, no sprags, and no roller clutches.
Transmission performance is controlled by six solenoids operated by
the Transmission Control Module (TCM), which is linked by a Class 2
data line to the Powertrain Control Module (PCM).
Operating Characteristics
As these unique features suggest, the Allison transmission has some
unique operating characteristics. A customer who is familiar with only
a lighter-duty drivetrain may interpret perfectly normal operation as
a cause for concern.
You can avoid unnecessary diagnosis if you can understand the reasons
behind these characteristics. Here are some highlights.
Grade Braking – The primary purpose of the grade-braking
feature is to utilize engine braking to slow a heavy vehicle on steep
grades, in order to reduce wear on the traditional braking system. The
method used to slow the vehicle is by overriding the PRNDL position,
effectively pre-selecting the next lower gear range automatically.
TIP: The engine
is designed to operate in the dashed red zone (fig.
2) on the tachometer but not in the solid red zone.
The engine can operate in the dashed red range but cannot produce any
power in this range. Do not operate the engine in the solid red zone.
When driving downhill on grades with heavy loads, the vehicle’s
inertia can be great enough to increase vehicle speed and consequently
engine speed without applying the throttle. To increase the availability
of grade braking and provide for additional engine braking, the engine
has been designed to allow operation in the dashed red zone region.
Operation in this region is normal and will not damage the engine.
Refer to Service Bulletin 02-07-30-004B.
Tow/Haul and Overdrive Disable – If the vehicle
has both Tow/Haul and Overdrive disable features (standard on 2003-04),
tap the button once to enable or disable Tow/Haul; press and hold the
button to enable or disable overdrive.
TIP: This feature
may be added to 2001-02 vehicles by installing a switch and wiring,
and reprogramming the transmission control module (TCM).
Refer to Service Bulletin 02-07-30-051A.
Tow/Haul Mode – Tow/Haul (T/H) can be used at
any time, even when not towing. Some drivers may not like the T/H shift
characteristics when the vehicle is lightly loaded, so normal mode would
be selected.
When the vehicle is not heavily loaded, some drivers switch from Normal
to T/H mode during closed throttle downshifts from highway speeds to
help slow the vehicle and then switch back to Normal mode after they’ve
stopped.
If T/H is not used when towing or when heavily loaded, the driver can
expect higher transmission sump temperatures, more wear and tear on
the brake system, and increased shift cycling.
T/H shift mode significantly changes the transmission’s shift
pattern to reduce cycling and to deliver better performance, control,
and cooling when towing/hauling heavy loads.
For instance:
- Upshift points are raised at light to mid throttle position to use
more of the engine’s available power for accelerating. Downshift
points are raised to enhance engine braking to help slow the vehicle.
- During deceleration, the torque converter clutch (TCC) remains applied
at closed throttle to much lower vehicle speeds to significantly improve
the effect of engine braking.
- During acceleration, the TCC is applied in 2nd range and remains applied
in 3rd, 4th, and 5th. This improves the drivetrain efficiency and significantly
lowers transmission sump temperature when towing heavy loads. The combination
of applying the TCC in 2nd range and the raised upshifts and closed
throttle downshifts results in more positive shift feel when operating
in this pattern. This is especially true when operating the vehicle
while lightly loaded. In Normal mode, TCC generally applies only in
higher ranges and is dependent on throttle position.
Refer to SI Document 1480544.
Overdrive Disable – The selector button is located
on the end of the column shift lever. The Overdrive Disable is turned
on and off by pressing and holding the button at the end of the column
shift lever until the IP indicator light illuminates. The Overdrive
Disable feature prevents the transmission from shifting into 5th gear.
Overdrive disable can be activated in either Normal or Tow/Haul mode.
TIP: Be careful
not to inadvertently select the Overdrive Disable function when only
the Tow/Haul function is intended. If so, the driver could sense that
grade braking is not working due to the fact that when in normal mode,
grade braking will not command downshifts below 4th range.
Park Pawl – The Allison transmission is equipped
with a park pawl designed to hold 26,000 lbs GCVW. The transmission
incorporates much larger parts than other automatic transmissions, and
the lever effort to shift the vehicle out of park may be highter than
lighter duty vehicles. An occasional clunk may be heard when the selector
lever is moved from Drive or Reverse to Park. This is normal and there
is no damage occurring during these shifts.
Clutch Operation – The Allison is a clutch-to-clutch
transmission. When shifting from one range to another, the transmission
drops one clutch and brings another clutch on to complete the transition
to the new range. In order to accomplish this smoothly, the handoff
from the off-going clutch to the on-coming clutch has to be timed precisely.
If the on-coming clutch gets capacity before the off-going clutch is
released, the shift has a tie-up feel. Under this scenario, three clutches
momentarily have capacity at the same time. When this occurs, the operator
of the vehicle may experience a head bob (a sensation where the vehicle
momentarily slows down). As soon as a tie-up shift is sensed by the
transmission, the off-going clutch is immediately dropped to minimize
the shift feel.
If the off-going clutch drops capacity before the on-coming clutch gains
capacity, the shift will flare. Under this scenario, only one clutch
momentarily has capacity, resulting in the transmission being in a neutral
gear state. This will result in an increase in engine speed during the
shift and a shift bump caused by a loss of acceleration. As soon as
a flare shift is detected, the transmission will utilize torque management
to control engine speed until the on-coming clutch gains capacity.
TIP: Both tie-up
and flare shifts can be experienced during the adaptive process (See
Adaptive Shift Controls below). This is normal as the transmission controls
learn the environment under which shifts are being performed. Shift
quality will improve as more shifts of each type are made.
Cold Operation – When the transmission is cold,
transmission fluid becomes more viscous and flows more slowly. This
change in transmission fluid viscosity results in the on-coming clutch
filling more slowly and the off-going clutch exhausting more slowly.
Due to different flow paths for the oil in the transmission, this difference
in timing is not the same for both the on-coming and off-going clutches.
To compensate for these differences, the electronic controls will modify
on-coming clutch fill times and off-going clutch exhaust times as sump
temperatures change, using a process known as characterization.
Characterization uses the individual transmission adaptive shift parameters
and adds a differential factor for cold transmission fluid. Additionally,
the adaptive process is turned off during cold temperature operation,
so shift quality is optimized during warmed up operation where the majority
of drive time will be spent.
When temperatures are very cold, the transmission will inhibit certain
ranges. The chart below shows range availability as a function of transmission
sump temperature.
| Sump
Temperature |
Range(s)
available |
| Above 5°
F (-15° C) |
All ranges |
| -13° to
5° F (-25 to -15° C) |
1st thru 4th
ranges only |
| -31° to
-13° F (-35 to -25° C) |
2nd and 3rd
ranges only |
| -31° F
(-35° C) or lower |
2nd range only |
Torque converter
clutch operation will be inhibited when transmission sump temperature
is below certain levels. The gas-powered trucks will inhibit torque
converter clutch operation below 68° F (20° C) transmission
sump temperature, and the diesel-powered trucks will inhibit torque
converter clutch operation below 86° F (30° C) transmission
sump temperature.
Shifts may be more noticeable with a cold transmission. This slight
difference in shift quality is normal.
Heater Performance Mode – On diesel-powered trucks,
a feature to shorten engine/cab warm-up times is provided. This feature
raises part throttle upshift points (2-3, 3-4, 4-5) to increase engine
speed when cold weather conditions are detected. Under these conditions
it is normal when the upshifts seem to hang or be delayed.
Adaptive Shift Controls – The Allison transmission
is equipped with adaptive shift controls, which continually compares
key shift parameters to pre-programmed ideal shift conditions. The transmission
makes adjustments in order to approach the ideal shift for vehicle speed,
load, and road conditions. During this process, some shifts may feel
different as the transmission determines optimum settings for a particular
shift.
Shift Stabilization – The shift stabilization
feature minimizes shift busyness, or hunting between ranges. The transmission
is designed to determine before making an upshift whether the engine
will be able to maintain vehicle speed in the next higher range. If
it senses that it will not, it will prevent the upshift from occurring.
4 Wheel Drive Operation – When operating in 4LO,
there is a very deep gear ratio reduction and the resulting shift feel
will be exaggerated. Sometimes a grinding noise may be noticed when
going to Park from Drive in 4LO. The deep gear ratio causes the internal
parts to be still rotating for a short period of time after the vehicle
comes to a stop. The operator should wait 1 to 2 seconds after coming
to a stop before engaging Park.
-
Thanks to John Janssen |
|
figure
1 |
|

figure 2
|
| return
to Table of Contents |
|
|
| Service
Programming Symbol |
A new service programming symbol is now in use (fig.
3). The symbol is used to indicate components that are capable
of being programmed or require a service setup.
In SI, you will find the symbol in the upper right corner of the schematic
page that inclues the component. When you click on the symbol, it will
take you to the Control Module Reference table (see the May 2004 TechLink
for more details on using this table). The table will guide you to the
appropriate procedure.
The service programming symbol may also appear on some components, either
on the parts label or embossed on the part itself.
-
Thanks to Devin Koski |

figure
3 |
| |
|
|
Programming Labor Time |
When
the labor time is established for the removal and replacement of a component,
the time required to perform programming or setup is included, if applicable.
It is not necessary to add other labor hours or include an additional
labor operation. All necessary time is included within the R&R labor
operation.
- Thanks to Devin Koski |
|
return to Table of Contents |
|
| Malibu
Outside Temperature Display |
In
the 2004 Malibu, the outside temperature readout is included in the
radio display. When the car is being driven, this indicates the outside
temperature, as determined by the outside temperature sensor.
Immediately after startup, the reading depends on several factors, including
the amount of time the vehicle was turned off, the vehicle speed, and
the value of the outside air temperature sensor.
Started with Key After Being Parked for 3 Hours
The BCM initializes the outside air temperature display to the value
of the actual outside air temperature reading.
Started with Key After Being Parked for Less Than 3 Hours, or
Anytime When Started with Remote Starter
The BCM initializes the outside air temperature display with the last
stored value when the vehicle was shut off. If the outside air temperature
is greater than the stored value, the display will not update
as long as the vehicle remains below 10 mph (16 kph). When the speed
is between 10 and 33 mph (16 and 53 kph), the readout updates after
approximately five minutes. And when the speed exceeds 33 mph (53 kph),
the update occurs after approximately three minutes.
If the current outside air temperature value is less than the stored
value, the lower value will be displayed immediately.
If the temperature sensor performs according to these parameters, everything
is OK. Do not attempt to repair or replace anything.
-
Thanks to Devin Koski |
| |
| return
to Table of Contents |
|
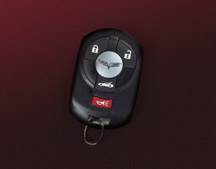
| Corvette
Keyless Ignition |
The 2005 Corvette keyless access system uses a coded transmitter fob
(fig. 4). With the transmitter fob inside
the passenger compartment, pressing the START button (fig.
5) on the instrument panel starts the engine. The engine is turned
OFF by briefly pressing the OFF/ACC button (fig.
5).
TIP: In most
respects, this system is identical to the one used on the Cadillac XLR,
covered in the February 2004 TechLink. However, there are some differences
in the keyless access system when the Corvette is equipped with a manual
transmission.
The ignition is not designed to turn off on vehicles equipped with a
manual transmission unless the transmission is in Reverse. This means
the ignition state will be Key On, Engine Off if the transmission is
not in Reverse when the OFF/ACC button is pressed.
This can affect some service procedures because the engine control module
(ECM) remains awake in the Key On, Engine Off state.
TIP: When performing
any service procedure calling for turning the ignition OFF on a manual
transmission car, be sure to place the transmission in Reverse before
pressing the OFF/ACC button.
After a reprogramming event or after performing a CKP System Variation
Learn Procedure, it’s necessary to turn the ignition OFF for a
period of time, to allow the data to be written to long term memory.
If the transmission is not in Reverse, the data will never be written
to long term memory because the ECM is waiting for the ignition state
to be OFF.
If the engine is started or the ignition is turned back to RUN under
the assumption that the ignition had been turned off after the procedure,
the write is aborted and all of the learned information is lost.
In the case of an ECM reprogramming or replacement, it could appear
that the ECM did not properly program. With a CKP learn, the ECM will
not store the learned values, which may cause DTCs to set.
TIP: If battery
voltage drops below 9v, electronic control modules shut down.
- Thanks to Morgan Chemello and Bob Vandenbush
| Condition |
Button
Press |
What
Happens |
| Engine
OFF, ignition OFF |
Press
START |
Ignition
ON, engine starts |
| Automatic
Transmission in Park, engine running |
Press
OFF/ACC |
Engine
OFF, ignition OFF, RAP enabled for up to 20 minutes. |
| Automatic
Transmission in Park, engine OFF, ignition OFF |
Press
OFF/ACC |
ACC
enabled. |
| Manual
Transmission in Reverse, engine running |
Press
OFF/ACC |
Engine
OFF, ignition OFF, RAP enabled for up to 20 minutes. |
| Manual
Transmission not in Reverse, engine running |
Press
OFF/ACC |
Key
On, Engine Off |
| Either
transmission, engine OFF, ignition OFF: |
Press
OFF/ACC |
ACC
enabled |
| Either
transmission, engine OFF, ignition OFF: |
Press
OFF/ACC for 5 seconds |
Key
On, Engine Off |
| NOTE:
All situations assume the correct fob is inside the vehicle. |
|
figure
4 |

figure
5 |
| |
| |
| |
| |
| return
to Table of Contents |
|
| Malibu
Fuel Tank Cap |
The
fuel tank cap for the 2004 Malibu and Malibu Maxx is not interchangeable
with the fuel cap on the previous (Classic) Malibu model.
-
Thanks to David McGillis
2004
Malibu and
Malibu Maxx
Fuel Tank Cap |
Previous
(Classic) Malibu Fuel Tank Cap |
| 22729974 or
10331673 |
10326370 or
10372245 |
|
|
return
to Table of Contents |
|
| Oil
Life System Reset Procedures -- Cars |
Many GM cars and trucks are equipped with an oil life system that determines
when an oil change is required. After the oil has been changed, it’s
necessary to reset the system.
Procedures for resetting 2001 through 2005 passenger cars are published
here. Trucks were published last month.
The information for this article is the same as you will find in the
applicable owner or service manual.
To find this information in 2001-4 eSI service manuals:
- Select the vehicle
- Select category General Information
- Select category Maintenance and Lubrication
- Select category Maintenance and then GM Oil Life System-Resetting.
Beginning with 2005 this information will only be found in owner manuals.
To find this information in eSI owner manuals:
- Select the vehicle
- Select Owner Manual
- Select Service and Appearance Care
- Select Checking Under the Hood
- Select Description and Operation
- Select Engine Oil Life System
TIP: You may
be able to use the Search function using the words Oil Life System Resetting.
TIP: You can
find copies of charts for earlier models on the TechLink website on
the Internet at http://service.gm.com. Look for the February and March
2000 issues and the May and June 2003 issues.
2001 - 04 Seville
2001 - 05 DeVille
1. Turn the ignition to ON but with the engine off.
2. Display the Oil Life message by pressing the Info button.
3. Press and hold the Reset button until the display shows 100% Engine
Oil Life. This resets the oil life index.
2001-02 Eldorado
1. Turn the ignition to Run but with the engine off.
2. Display the OIL LIFE LEFT message by repeatedly pressing the SKIP
INFO button.
3. Press the NO INFO RESET button until the display show 100% Engine
Oil Life. This resets the oil life index.
2003 - 05 CTS
Base Audio System
1. Press the up or down arrow on the INFO button located to the right
of the DIC display to access the DIC menu.
2. Once XXX% ENGINE OIL LIFE menu item is highlighted, press and hold
the CLR button.
3. The percentage will return to 100, and the oil life indicator will
be reset.
4. Repeat the steps if the percentage does not return to 100.
Navigation System
1. Turn the system on by pressing the PWR/VOL knob once. The PWR/VOL
knob is located to the lower left of the DIC display.
2. Press the INFO button located to the left of the display to access
the Vehicle Info menu.
3. Turn the TUNE/SEL knob located to the lower right of the display
until Engine Oil Life is highlighted. Press the knob once to select
it.
4. Once XXX% Engine Oil Life is displayed, press the multi-function
button next to the Reset prompt in the upper right corner of the display.
5. The percentage will return to 100, and the oil life indicator will
be reset.
6. Repeat the steps if the percentage does not return to 100.
2004 - 05 SRX
Base Audio System
Press the CLR button on the right of the DIC display to acknowledge
the Change Engine Oil message. This will clear the message from the
display and reset it. To reset the oil life indicator, use the following
steps.
1. Press the up or down arrow on the INFO button located to the right
of the DIC display to access the DIC menu.
2. Once XXX% ENGINE OIL LIFE menu item is highlighted, press and hold
the CLR button. The percentage will return to 100, and the oil life
indicator will be reset.
3. Turn the key to OFF.
If the Change Engine Oil message comes back when you start the vehicle,
or the percentage does not return to 100, the engine oil life system
has not reset. Repeat the procedure.
Navigation System
Press the display button to acknowledge the Change Engine Oil message.
This will clear the message from the display and reset it. To reset
the oil life indicator, use the following steps.
1. Turn the ignition to ON with the engine running.
2. Turn the system on by pressing the PWR/VOL knob located to the lower
left of the DIC display.
3. Press and hold the vehicle information display button located in
the upper right of the screen for 3 seconds to enter the vehicle information
menu.
4. Use the scroll up or down display keys to select Engine Oil Life.
5. Press and hold the RESET button on the display. The percentage will
return to 100, and the oil life indicator will be reset. Repeat the
steps if the percentage does not return to 100.
6. Press the RETURN button on the display to return to the main page.
7. Turn the key OFF.
If the Change Engine Oil message comes back when you start the vehicle,
the engine oil life system has not reset. Repeat the procedure.
2004 - 05 XLR
2005 STS
1. Press the up or down arrow to scroll the DIC to show OIL LIFE.
2. Once the XXX% ENGINE OIL LIFE menu item is highlighted, press and
hold the RESET button until the percentage shows 100%. Repeat the steps
if the percentage does not return to 100.
3. Turn the key to OFF.
If the Change Oil Now message comes back when you start the vehicle,
the engine oil life system has not reset. Repeat the procedure.
2001 - 05 Impala
2002 - 05 Monte Carlo
Using the Radio
1. Turn the ignition to ACC or ON, with the radio off.
2. Press and hold the TUNE DISP button on the radio for at least 5 seconds
until SETTINGS is displayed.
3. Press the SEEK PTYPE up or down arrow to scroll through the main
menu.
4. Scroll until OIL LIFE appears on the display.
5. Press the 1 PREV or 2 NEXT button to enter the submenu. RESET will
be displayed.
6. Press the TUNE DISP button to reset. A chime will be heard to verify
the new setting and DONE will be displayed for one second.
7. Once the message has been reset, scroll until EXIT appears on the
display.
8. Press the TUNE DISP button to exit programming. A chime will be heard
to verify the exit.
Using the Accelerator Pedal
1. Turn the ignition to ON, with the engine off.
2. Fully press and release the accelerator pedal 3 times within 5 seconds.
3. If the CHANGE ENGINE OIL message flashes, the system is reset. However,
if it stays on, it did not reset. You’ll need to repeat the procedure.
2001 - 02 Intrigue
2001 - 03 Grand Prix w/o Trip Computer
2001 - 04 Century and Regal w/o DIC
2005 Century
1. Turn the ignition to RUN, with the engine off.
2. Fully press and release the accelerator pedal slowly 3 times within
5 seconds.
3. If the CHANGE OIL SOON light flashes, the system is resetting.
4. Turn the key to OFF after the light has finished flashing, and then
start the vehicle.
5. If the CHANGE OIL SOON light comes back on, the engine oil life system
did not reset. Repeat the procedure.
2001 - 04 Regal with DIC
1. Turn the ignition to RUN, with the engine off.
2. Fully press and release the accelerator pedal slowly 3 times within
5 seconds.
3. If the CHANGE OIL SOON light flashes, the system is resetting.
4. Turn the key to OFF after the light has finished flashing, and then
start the vehicle.
5. To reset the DIC put the oil life display on the DIC.
6. Press the DIC RESET button for five seconds.
7. If the CHANGE OIL SOON light comes back on, the engine oil life system
did not reset. Repeat the procedure.
2001 - 03 Grand Prix with Trip Computer
1. Press the MODE button until the light appears lit next to OIL LIFE.
2. Press and hold the RESET button for three seconds. The oil life percentage
should change to 100%.
2004 – 05 Grand Prix
1. Press the options button on the DIC until ENGINE OIL MONITOR appears
on the DIC screen.
2. Press the set/reset button to reset the system.
The next screen indicates that the engine oil monitor has been reset.
If the vehicle is equipped with the trip computer DIC, when the gage
button is pressed and the OIL LIFE REMAINING mode appears, it should
read 100 % OIL LIFE REMAINING.
3. Turn the key OFF.
If the Change Oil Soon message comes back when you start the vehicle,
the engine oil life system has not reset. Repeat the procedure.
2004 – 05 GTO
1. Turn the ignition to RUN, with the engine off.
2. Fully press and release the accelerator pedal slowly 2 times within
5 seconds.
3. Turn the ignition to LOCK.
4. Start the engine.
5. If the CHANGE OIL light comes back on, the engine oil life system
did not reset. Repeat the procedure.
2005 Allure and LaCrosse
1. Turn the ignition to RUN, with the engine off.
2. Fully press and release the accelerator pedal slowly 3 times within
5 seconds.
3. Turn the ignition to OFF then start the engine.
5. If the light or message comes back on, the engine oil life system
did not reset. Repeat the procedure.
2001 - 03 Aurora
1. With the ignition on, press the SELECT right arrow button on the
DIC to OIL so the OIL LIFE percentage is displayed.
2. Press RESET and hold for five seconds. OIL LIFE XXX% will appear
and then when the button is released OIL LIFE 100% will be displayed.
2001 - 05 Bonneville
1. Display OIL LIFE on the DIC.
2. Press and hold the RESET button for more than five seconds. The oil
life will change to 100%.
2001 - 05 LeSabre
2001 - 05 Park Avenue
1. Display OIL LIFE INDEX on the DIC.
2. Press and hold the RESET button on the DIC for more than five seconds.
The oil life will change to 100%.
2001 – 05 Corvette
1. Turn the ignition to ON, with the engine off.
2. Press the TRIP button so the OIL LIFE percentage is displayed.
3. Press RESET and hold for two seconds. OIL LIFE REMAIN 100% will appear.
2001 - 02 Camaro
2001 - 02 Firebird
1. Turn the ignition to RUN but with the engine off.
2. Push the Trip/Oil Reset button located on the instrument panel for
12 seconds. The Oil Change light will start to flash to confirm that
the system is reset. The reset is completed when the Oil Change light
goes out.
2001 - 03 Grand Am
2001 - 03 Alero
1. Turn the ignition to ON.
2. Push the RESET button located in the driver’s side instrument
panel fuse block. The CHANGE OIL light will start to flash.
3. Press and hold the RESET button again. The reset is complete when
you hear the chimes sound and the CHANGE OIL light goes out.
2004 - 05 Grand Am
2004 Alero
2005 Cobalt
2005 Pursuit
1. Turn the ignition to RUN, with the engine off.
2. Fully press and release the accelerator pedal slowly 3 times within
5 seconds.
3. The reset is complete when you hear the chimes and the Change Oil
light goes out. If the light stays on and no chime is heard repeat the
reset procedure.
4. Turn the key to OFF.
5. Start the engine. If the CHANGE OIL SOON light comes back on, the
engine oil life system did not reset. Repeat the procedure.
2005 G6
1. Turn the ignition to RUN, with the engine off.
2. Fully press and release the accelerator pedal slowly 3 times within
5 seconds.
3. When the reset is complete, the Change Oil Soon message can be cleared.
Press and hold the Enter button for at least 1 second. An Acknowledged
display message will appear for 3 seconds or until the next button is
pressed.
4. Turn the key to OFF.
5. Start the engine. If the CHANGE OIL SOON message comes back on, the
engine oil life system did not reset. Repeat the procedure.
2004- 05 Malibu
1. Display OIL LIFE RESET on the DIC.
2. Press and hold the ENTER button for at least one second. An ACKNOWLEDGED
display message will appear for 3 seconds or until the next button is
pressed. This will tell you the system has been reset.
3. Turn the key OFF.
If the Change Oil Soon message comes back when you start the vehicle,
the engine oil life system has not reset. Repeat the procedure.
2002-05 Saturn L
1. Turn the ignition to RUN, with the engine off.
2. Fully press and release the accelerator pedal 3 times within 5 seconds.
3. If the CHANGE OIL SOON light is flashing, the system is reset. The
light will flash for up to 30 seconds or until the ignition is turned
off.
4. If the light comes on again and stays on for 30 seconds at the next
ignition cycle, it did not reset. Reset the system again.
2003-05 Saturn Ion
1. Press and release the trip/reset button until the OIL LIFE message
is displayed.
2. Press and hold the trip/reset button until a chime sounds 5 times
and RESET is displayed in the message center. When the system is reset,
the odometer will again be displayed in the message center.
3. Turn the key OFF.
If the CHG OIL message comes back on when you start the vehicle, the
system has not reset. Repeat the procedure.
-
Thanks to Jerry Garfield |
| |
|
return
to Table of Contents |
|
| Rendezvous
AWD Transmission and Transfer Case Removal |
In
an LY7 (3.6L) equipped Rendezvous AWD, the complete powertrain (engine,
transmission, transfer case and frame) must be removed as a unit. The
transmission and transfer case can then be serviced with the powertrain
out of the vehicle.
Do not attempt to remove the transmission or transfer case with the
engine remaining in the vehicle. Component damage and significant repair
delays could occur if the correct procedures are not followed.
IMPORTANT: This applies
only to Rendezvous LY7 AWD configurations. In all other Rendezvous powertrain
configurations (LY7 FWD, LA1 FWD and AWD) the engine remains in the
vehicle during transmission and transfer case service procedures. SI
covers these repair procedures and their differences.
- Thanks to Russ Gilbert and Kevin Willcock |
| |
| return
to Table of Contents |
|
| Labor
Time Guide Change |
For
complete details, refer to Warranty Information Letter 04-03-08-010.
Here are the highlights.
A change to the labor time guide effective April 1, 2004 eliminates
the labor allowances for the replacement of certain components in sets:
- struts
- strut mounts
- wheel bearings
- control arms.
It is very unlikely that both components in a set will fail at the same
time. Proper repair order write-up, diagnosis and service procedure
will allow the technician to determine which component on the vehicle
is the root cause of the customer concern.
Standard strategy-based diagnostics, including test drives to duplicate
the customer concern, use of the Chassis Ear and other aids allow the
technician to identify the specific side of the vehicle involved in
the customer concern. This avoids replacement of both components when
only one has failed.
TIP: The defective
component causing the customer concern should be the only component
replaced.
TIP: Use both
the Replace Right and Replace Left labor operations only if both components
have failed and require replacement.
IMPORTANT: Parts may be
requested returned to the Warranty Parts Center for analysis.
- Thanks to Steve Oakley |
| return
to Table of Contents |
|
| Top
Tier Detergent Gasoline |
This information applies to all 2005 and prior General Motors passenger
cars and trucks (U.S. and Canada only).
Top Tier Detergent Gasoline, a new class of gasoline with enhanced detergency,
will be appearing at retail stations of some fuel marketers. This gasoline
meets new, voluntary deposit control standards developed by General
Motors, BMW, Honda and Toyota.
The U.S. EPA requires all gasoline sold in the U.S. to contain a detergent
additive. However, the requirement is minimal and in many cases is not
sufficient to keep engines clean. A higher level of detergent is needed
than what is required by the EPA. Top Tier Detergent Gasoline exceeds
the detergent requirements imposed by the EPA.
The four corporations recognized the benefits to both the vehicle and
the consumer. Also, joining together emphasized that low detergency
is an issue of concern to several automotive companies.
All vehicles will benefit from using Top Tier Detergent Gasoline, which
will help keep engines cleaner than gasoline containing the lowest additive
concentration set by the EPA. Clean engines help provide optimal fuel
economy and performance, and reduced emissions. Those vehicles that
have experienced deposit related problems would especially benefit from
use of Top Tier Detergent Gasoline.
The Top Tier program, begun on May 3, 2004, is a voluntary program initiated
by the four automotive companies. Some fuel marketers have already joined,
although not all fuel marketers will offer Top Tier Detergent Gasoline.
Once fuel marketers make public announcements, a list of all fuel marketers
meeting Top Tier standards will be made available. For now, it will
be necessary to look for the “Top Tier” designation at the
gas pump.
-
Thanks to Andy Buczynsky, Jay Dankovich and Jerry Garfield |
|
return
to Table of Contents |
|
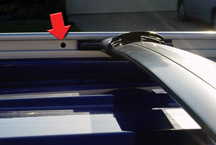
| Equinox
Roof-Rails and Cross-Bars |
On the 2005 Equinox, incorrect diagnosis of noise and/or functionality
of the luggage carrier may result if the cross-bars are not correctly
locked in one of the four locking positions (holes). If the cross-bars
are outside of the locking positions (fig. 6),
the cross-bar locking levers will not completely engage and the cross-bars
may rattle.
-
Thanks to Chuck Berecz |
figure
6 |
|
return
to Table of Contents |
|
| Colored
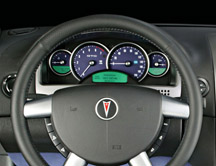
Instrument Clusters |
Instrument
clusters in the 2004 Pontiac GTO are available in colors (figs.
7 and 8); many of them match the exterior color of the car. Here
are the part numbers.
Instrument
Cluster Color
|
Part
Number
|
Exterior
Color |
Cosmos
Purple |
92174644 |
Cosmos
Purple |
Barbados
Blue |
92174645 |
Barbados
Blue |
Yellow
Jacket |
92174646 |
Yellow
Jacket |
Torrid
Red |
92174647 |
Torrid
Red
Phantom Black
Quicksilver
|
Impulse
Blue |
92174648 |
Impulse
Blue |
-
Thanks to Art Spong |
figure
7 |
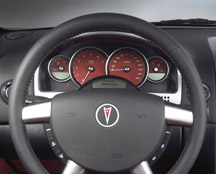
figure
8 |
|
return
to Table of Contents |
|
| Windnoise
at Right Rear Door |
Owners
of some 2003-04 DeVilles may comment on a prominent windnoise occuring
during vehicle travel at the right rear door. The forward leading edge
of the upper division post may have a slight gap to the door glass (A
in illustration) (fig. 9).
To correct this, finesse the upper end of the moulding inboard (B in
illustration) approximately 3/32-in. (1-3 mm) to eliminate the gap.
Refer to Service Bulletin 04-08-58-003 for further details.
- Thanks to Bill Denton |
|
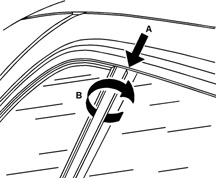
figure
9 |
| return
to Table of Contents |
|
| Auto
Lock Feature |
Some
owners of 2004 Bonneville GXPs may report that the personalization feature
always locks all doors when the transmission is shifted out of park,
and always unlocks doors when shifted back into park. This occurs no
matter how the driver sets the personalization for Auto Lock/Unlock
feature.
TIP: This can
be corrected with the Tech 2. Build the vehicle as follows:
- 2004 Pontiac Bonneville GXP
- Body
- DIM
- Special Functions
- Set Options
- DIC Option
Then turn the DIC Present bit on.
Vehicles built after 4-08-04 and VIN 1G2HZ54Y44U244632 do not have this
concern.
- Thanks to Kobie Glenn |
| |
| return
to Table of Contents |
|
| Fuses
Pulled for Shipping |
The
IPC and radio fuses of the 2004 Pontiac GTO are shipped in a plastic
bag in the glovebox along with the owner literature. These fuses should
be installed during PDI.
-
Thanks to Art Spong |
| return
to Table of Contents |
|
| Ground
Bolt on Diesel Engine |
Some
Chevrolet and GMC vehicles with 6.6L (LB7 LLY) diesel engine may exhibit
rough idle, clatter noise, stall and/or DTC P1223 through P1244. The fuel
injector balance rates fluctuate during the rough idle. The IGN 1 voltage
may read 12.9 volts all the time, regardless of rough running condition.
After completing the published diagnostics, and the concern described
above remains, check for a loose ground bolt at the lower right side of
the engine block (G102 and/or G106) to correct this concern. Refer to
SI for the location of ground bolt.
- Thanks to Jack McVoy |
|
|
|
return
to Table of Contents |
|
| Steering
Clunk Noise |
Owners
of some 2000-04 Pontiac Bonnevilles may comment on a clunk type noise
coming from the front of the vehicle during a turning maneuver. This
condition may also be felt through the steering wheel when the vehicle
is stationary and the wheel is rotated from steering stop to steering
stop. This clunk noise will be noticed during low speed acceleration
or deceleration, typically in light turns of the steering wheel. A new
intermediate steering shaft part number 10367811 is available through
GMSPO.
-
Thanks to Roger Jantz |
|
|
| return
to Table of Contents |
|
| Radio
Volume |
Owners
of some 2003-04 Chevrolet and GMC full size trucks and utilities may
comment that after the radio has been reprogrammed or replaced, the
volume is not as loud at the same volume setting as before.
TIP: This applies only to vehicles with RPO UQ7
without RPO Y91.
A new Audio Calibration part number 10364319 was released to enhance
low end volume control resolution. This calibration does not change
the upper end of the radio volume control, and the volume will get as
loud as the old calibration. But the low end volume control has been
changed so that each click of the volume control raises the actual volume
at a slower rate than the previous radio calibration.
This is normal and no repairs should be made.
-
Thanks to Jim Will |
| return
to Table of Contents |
|
| Injector
Seal on Diesel Engine |
On
a 2004 6.6L LLY diesel engine, if an fuel injector compression leak
noise or soot around the injector body is found, the injector copper
sealing washer and rubber O-ring copper may be damaged or missing.
If the copper sealing washer or the rubber O-ring are required, they
are now available through GMSPO using the following part numbers:
| Injector
copper sealing washer |
97327722 |
| Injector
rubber O-ring |
94013303 |
TIP:
Both of these are ship-direct parts and require a SPAC case. -
Thanks to Jack McVoy and Dave Cox |
|
|
| return
to Table of Contents |
|
| Shift
Lever Interlock |
Some
2003-04 Pontiac Aztek models will randomly fail to release the transmission
shift handle, and the ignition key must be cycled before the shift handle
is enabled. This condition has been identified as a communication issue
with the circuits passing through the BCM. At times, the appropriate
signal is not understood and the interlock signal is not being sent.
This condition is rarely repeated for several key cycles and depends
on how many other devices are attempting communications at the same
time.
A new Body Control Module (BCM) went into production March 15, 2004
to address this concern. The new part number is 15143352 and replaces
10334030. Only the new part number should be used if the owner is reporting
this condition. Service stock for the 10334030 is nearly exhausted and
Aztek models for model years 2001-2004 will all be serviced using the
new part.
-
Thanks to Amy Sutherland |
|
| return
to Table of Contents |
|
| Misfire
Code |
Some
2004 4.6L (LH2) RWD Northstar engines may set a P0300 misfire code under
extremely light engine loads (such as slight downhill, or in Park/Neutral
at 1000 -1200 rpm). The condition will be evident in all cylinders when
viewing the Tech 2 misfire graph display. The misfire starts in one
cylinder, then spreads to the remaining 7 cylinders. This misfire is
usually not felt in the vehicle. No other PCM DTC codes will be present.
Inspect the serpentine belt tensioners for clicking / chattering / jumping.
As part of your diagnostics, remove both serpentine belts. Then monitor
the engine misfires with the Tech 2. Verify the absence of the prior
noises. If running the engine with both serpentine belts removed eliminates
the concern, replace both serpentine belts. The small changes in the
belt/ crankshaft speed are detected as misfires.
-
Thanks to Jack McVoy |
| |
| return
to Table of Contents |
|
| PI
Numbering |
At
the end of June, a change was made to SI to improve access to information.
SI is now being updated daily, Monday through Friday, instead of weekly.
PIs (Preliminary Information) are now accessible without the use of
a specific VIN. There have also been some minor changes to the PI numbering
process.
PI00001 was formerly a PI viewable in SI.
AI00001 was formerly a PI that was not viewable in SI, and must be accessed
by calling TAC.
The new designations are listed by either P for Powertrain, T for Truck,
or C for Car. PIs in this new format will appear as follows:
| PI
designation |
Pertains
to |
| PIP3001 |
Powertrain,
in SI |
| PIT3001 |
Trucks,
in SI |
| PIC3001 |
Cars,
in SI |
| AIP3001 |
Powertrain,
not in SI |
| AIT3001 |
Trucks,
not in SI |
| AIC3001 |
Cars,
not in SI |
REMINDER:
Some issues pertain to both Cars and Trucks, so there could be overlap.
Although not all PIs are accessible through SI, more than 80% of all PIs
being written are going into SI daily. -
Thanks to Sean Garrison |
| |
| return
to Table of Contents |
|
 Car Issues – Fix It Right The First Time
 |
Model
Year(s) |
Vehicle
Line(s) --
Condition |
Do
This |
Don’t
Do This |
Reference
Information / Bulletin |
2001-2004 |
Aztek,
Rendezvous (FWD), Venture/Montana/Silhouette – Pop and/or
Rattle in Exhaust Down Pipe |
Follow
procedure in bulletin using clamp on down pipe to correct rattle/buzz
noise. |
Don’t
replace converter assembly for rattle/buzz noise without completing
instructions in bulletin. |
03-06-05-003 |
2000-2004 |
All
Cars with 4T40/4T45E and 4T65E – Light On/Various Transmission
Codes Stores |
Check
transmission 20-way connector for secure connection |
Don’t
replace transmission, TCC PWM, VSS, PCS or valve body. |
02-07-30-022B |
1998-2004 |
Seville
– Heated Seat Inoperative |
Replace
only needed heating element. |
Don’t
replace entire seat cover if heated seat element is inoperative. |
01-08-50-002C |
2001-2004 |
Century/Regal
– Intermittent SES, ABS or TCS Lamp Illuminated, Engine
No Crank/No Start, Various I/P Cluster Intermittents, DTCs Set,
Shifter Locked in Park (BTSI Inoperative) |
Check
UBEC harness connectors for damage and replace damaged terminals. |
Don’t
replace UBEC, ignition switch, SDM, BCM, shifter assembly (Regal)
or intermittently inoperative clusters. |
03-08-45-004 |
2000-2004 |
Cavalier/Sunfire/Alero/Grand
Am – Inoperative Sunroof Module |
Retime
module or replace only motor for inoperative complaints. |
Don’t
replace entire sunroof module assembly. |
03-08-67-009A |
2003-2004 |
Cavalier/Sunfire
– Air Conditioning Compressor Noisy |
Inspect
for ground out conditions that can cause A/C compressor noise
complaints. |
Don’t
replace A/C compressor for excessive noise without inspecting
for ground outs. |
03-01-38-012 |
1999-2004 |
All
Cars and Trucks – Brake Warranty, Service and Procedures |
Issue
One: Refinish brake rotor.
Issue Two: Measure for LRO |
Issue
One: Don’t replace the brake rotors.
Issue Two: Don’t measure for LRO |
00-05-22-002D |
2003-2004 |
CTS
– Variable Effort Steering (VES) “Service Steering
Message,” DTC C1241 or C0450 |
Replace
only VES solenoid. |
Don’t
replace entire steering gear. |
03-02-36-001 |
2003 |
All
cars with 4T40/45E, 4T65E and 4T80E – Code P0742 |
Replace
TCC PWM Solenoid |
Don’t
replace transmission, torque converter or valve body assembly. |
02-07-30-039C |
2000-2003 |
LeSabre,
Park Avenue, Regal, Impala, Monte Carlo, Bonneville, Grand Prix
With 3.8L V6 Engine (RPO L36) – Loss of Coolant, Milky Colored
Oil |
Replace
upper intake manifold gasket only. |
Don’t replace upper intake manifold assembly for coolant
leak condition. |
03-06-01-016 |
|
| return
to Table of Contents |
|
|
 Truck Issues – Fix It Right The First Time (new issues in bold)
|
Model
Year(s) |
Vehicle
Line(s) --
Condition |
Do
This |
Don’t
Do This |
Reference
Information / Bulletin |
2002-2004 |
Fullsize and Midsize Pickups and Utilities – Labor Operation
Assignments for Control Module Reprogramming |
When
reprogramming an electronic module, use labor operation that reflects
module being programmed. |
Do
not use K5364, which is for reprogramming TCM, when reprogramming
TCCM. |
02-04-21-006D |
2002-2004 |
Fullsize and Midsize Pickups and Utilities – Sleepy New
Venture Gear Transfer Case Control Module |
Verify
sleepy module as primary cause. Reprogram TCCM with latest software
released 3/11/04. |
Don’t
replace encoder motor or transfer case. Replace the module only
if a C0550 DTC shows as current or in history. |
02-04-21-006D |
2004 |
Fullsize Pickups – 6.6L LLY Diesel Engine Injectors |
04
LLY Duramax fuel injector is on restriction. Contact TAC for authorization. |
Do
not replace an LLY Duramax injector prior to contacting TAC. |
GM
Messenger VSS20040067 |
2002-2003 |
Chevrolet
Avalanche and Cadillac Escalade EXT – Cargo Covers and Cladding
Faded or Stained |
Thoroughly
clean, dry and treat components with “Armor-dillo.”
To order call (888)393-4722 or online at www.armor-dillo.net. |
Don’t
replace cargo covers for this condition. |
04-08-111-001 |
2002-2004 |
Fullsize and Midsize Pickups and Utilities – Transfer Case
CNND Labor Operation |
Use
Labor Operation K9993 whenever transfer case issue on a 4WD or
AWD vehicle cannot be duplicated or resolved after diagnostic
efforts. |
Don’t
use Labor Operation K9992, which is for manual transmission concerns
or Labor Operation K9995, which is for automatic transmission
concerns. |
Service
VME
VSSM20030117 |
2002-2004 |
Fullsize
Pickups – Rear Leaf Spring Slap Noise |
Replace
inserts and rubber washers. |
Don’t
replace leaf spring. |
03-03-09-002 |
| 2002-2004 |
All
Passenger Cars and Trucks – Air Conditioner Compressor Diagnosis |
Follow
SI and bulletin for diagnostic information before compressor replacement. |
Don’t
replace air conditioning compressor. |
01-01-38-013A
03-01-38-019 |
| 2002-2004
(models with HomeLink™ option) |
All
TrailBlazers, All Envoys, Bravada, Rainier with HomeLink Universal
Transmitter – Programming Diagnosis |
Use
J 41540 – GM Integrated HomeLink Tester (essential tool).
Follow SI and refer customers to their Owner’s Manual. |
Don’t
replace HomeLink Transceiver without validating internal fault |
01-08-97-001B |
| 2002-2004 |
All
TrailBlazers, Envoy, Envoy XL, Bravada – Squeak/Rub/Scrub
Type Noise in Steering Column |
Lubricate
and remove material, per bulletin. |
Don’t
replace upper or lower intermediate shaft. |
02-02-35-006A |
2001-2004 |
Fullsize
Pickups and Utilities – Servicing Wide Load Mirrors (RPO
DPF) |
Replace
individual parts as needed. |
Don’t
replace complete mirror assembly. |
03-08-64-028
|
|
| return
to Table of Contents |
|
|
| Know-How
Broadcasts for September |
| |
 |
| Know-How
Broadcasts for September |
| September
9, 2004 |
10280.09D
Emerging Issues
- Pontiac, Buick, GMC
- Chev Cars & Trucks
- Cadillac, Hummer |
All
Eastern Time:
12:30 PM,
1:00
PM,
1:30 PM
|
| September
23, 2004 |
10280.21D
2005 Crossover Sport Vans -- New Model Features |
9:00
AM, 12:30 PM, 3:00 PM Eastern Time |
| -
Thanks to Tracy Timmerman |
|
|
| return
to Table of Contents |
|
|
